We recommend that faculty do the following at the start of each semester to get their Blackboard courses ready.
Confirm Your Course Is in Blackboard
If you do not see the course, contact your department scheduling coordinator. List of
department scheduling coordinators
Courses cross-listed in Banner/PatriotWeb will created a combined/master course in Blackboard with enrollments from both sections.
To have two or more sections of the same course combined in Blackboard, submit a course combine request form.
Enroll Others in the Course
Enroll all other Instructors, TA's, Course Builders, Graders, and Guests into the course. You must change additional settings if using Guest Access.
Instructions for How to Set up Guest Access in Blackboard
Copy a Previous Semester's Course
If you are teaching the same course this semester that you have taught previously (or someone else in your department is willing to share their course with you), consider copying that course into the current semester course. Please read our instructions to avoid copy issues.
> How to Copy a Blackboard Course
Once a course copy is complete:
- Remove any unnecessary links, content, grade center columns, etc.
- Check all course links, tool links, weblinks, and file links to confirm they work properly
- Add, update, and/or remove date restrictions and due dates in content areas, assessments, assignments, discussion forums, etc., or run the Blackboard Date Management tool
- Add, update, and/or remove adaptive release rules in content areas, assessments, and assignments
- Fix ERRORS on the Respondus LockDown Browser Dashboard page
Plan Your Course Structure
The course menu is completely customizable. How will you organize all of the course contents and tools? What makes most sense for your students? Many instructors choose to create a weekly folder structure and put everything for that week into a single folder. Look at the
Stearns Center's Online Course Quality checklist and their
sample Blackboard course template.
Online Meetings or Office Hours
If your class meets online or if you want to set up online office hours choose if you plan to use
Zoom,
Class Collaborate, or other tool. Consider scheduling out the meeting times in advance.
Set up your Grade Center
Grade center allows students to keep track of their grades throughout the semester so they know exactly where they stand:
- Remove manually created Grade Center columns no longer being used
- Set up the Weighted Total and/or Total column
- Confirm Blackboard's grading schema matches the schema for your department
- Hide Grade Center columns from students that you don't want them to see
- Check Column Organization for hidden columns that you may want to view in the Grade Center
- Delete duplicate Grade Center columns
If you made a Course Copy, ensure there are no duplicate or hidden columns. In the Full Grade Center, go to Manage > Column Organization to confirm.
Upload the Syllabus and Add Content
Be sure to verify your contact information, textbook information, etc. Visit the
Stearns Center for Teaching and Learning website for information on designing your syllabus. Read information about connecting your Blackboard course with
publisher integrations and other third-party tools.
Make Your Course Available to Students
Post a welcome announcement to your course, including contact information, office hours, etc. and then send it to your students by email to let them know your Blackboard course is now available.
Consider making the course available several weeks before the semester begins to provide students access to your syllabus, including required textbooks and technology requirements.
> How to Make Your Course Available to Students
> How to Send a Message or Email your Students with Blackboard
Optional Items
Create a Practice Area
If using additional tools such as
Class Collaborate, Zoom, or
Respondus Monitor, create a practice area where students can test their computer before they need to use the tool in your course.
Select the Course Entry Page
The course entry point is the first area users see when they enter your course. The default course entry point is the Home Page. You may want to create a welcome page or use Announcements as the homepage. In the course, go to
Control Panel >
Customization >
Teaching Style to set the entry page.
Set up Attendance Tool
If you intend to use the Attendance tool, set up Attendance on the Attendance Settings page.
> How to Set up Attendance Tool.
Create a Welcome Video with Kaltura
Kaltura is a video management tool that allows faculty and students to easily create, host, and share video and audio inside the Blackboard course environment. See
How to Record a Video in Kaltura Using a Webcam.
Publisher Tools
If you are using an online portal from a textbook publisher, you may need to turn on the tool in your course. We have
links to publisher integration information. If you don't see your publisher, under Content Management, go to
Customization >
Tool Availability and check off boxes next to your publisher tool. Contact your publisher rep for exact details about how their tool connects to Blackboard.
Create Course Groups
Encourage student collaboration by creating course groups. Confirm that all students are assigned to groups after the drop/add period ends.
> How to create and manage groups.
Place Items on Reserve at Mason Libraries
Set up
Leganto for course reserves and e-readings.
Add Class Schedule and Office Hours to the Calendar
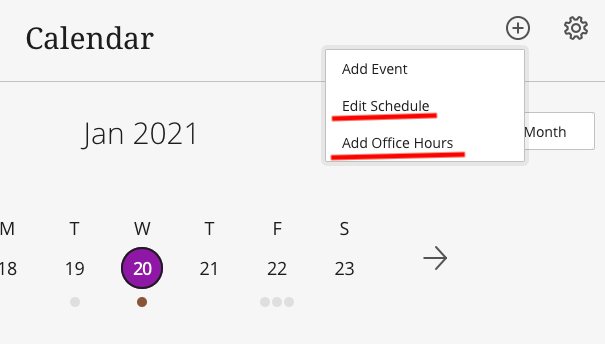
Set your office hours and class meeting schedule for your students. You can set up office hours and class meeting times for each of your classes separately. After logging into Blackboard, click Calendar on the left. Then the + button. You can add a location or link for meeting times.

Review Your Course Detail
Review your course description, course card image, course format, and course visibility. In your course, under the Course Management section (bottom left) go to Customization > Properties.

