• Report an IT Security Incident
  • Request Help
  • Help & Support
    • Working/Learning Remotely
    • Request Help
    • Live Chat
    • Track a Ticket
    • Knowledge Base
    • Getting Started
    • Contact Us
    • ITS Alerts Sign Up
  • Service Catalog
    • Accounts & Access
    • Communications & Collaboration
    • Computers & Software
    • Data, Reporting & Analytics
    • Network & Internet Services
    • Pilot Services
    • Professional Services
    • Research Computing
    • Teaching & Learning
    • University Applications
    • Web, Servers & Hosting
  • About ITS
    • Our Team
    • Strategic Plan
    • Annual Reports
    • Awards
    • Student Employment
  • Working with ITS
    • Architectural Standards Review Board
    • Projects & Project Management
    • Technology Investment Request Lifecycle
    • Governance Committees
    • Business Intelligence
    • Enterprise Data Integration Services (EDIS)
    • GMU-TV
    • IT Security Office
  • Alerts & Bulletins
    • Unplanned Outages
    • Phishing Alerts
    • Maintenance
    • Bulletins
    • Spotlights
    • After Action Reports
    • Archives
  • Report an IT Security Incident
  • Request Help
X Hide

Information Technology Services

Skip to content
  • Help & Support
    • Working/Learning Remotely
    • Request Help
    • Live Chat
    • Track a Ticket
    • Knowledge Base
    • Getting Started
    • Contact Us
    • ITS Alerts Sign Up
  • Service Catalog
    • Accounts & Access
    • Communications & Collaboration
    • Computers & Software
    • Data, Reporting & Analytics
    • Network & Internet Services
    • Pilot Services
    • Professional Services
    • Research Computing
    • Teaching & Learning
    • University Applications
    • Web, Servers & Hosting
  • About ITS
    • Our Team
    • Strategic Plan
    • Annual Reports
    • Awards
    • Student Employment
  • Working with ITS
    • Architectural Standards Review Board
    • Projects & Project Management
    • Technology Investment Request Lifecycle
    • Governance Committees
    • Business Intelligence
    • Enterprise Data Integration Services (EDIS)
    • GMU-TV
    • IT Security Office
  • Alerts & Bulletins
    • Unplanned Outages
    • Phishing Alerts
    • Maintenance
    • Bulletins
    • Spotlights
    • After Action Reports
    • Archives

Knowledge Base

Home > Help & Support > Knowledge Base > Teaching & Learning > Blackboard > How to Provide Guest Access to your Course in Blackboard

How to Provide Guest Access to your Course in Blackboard

By default, guest access in Blackboard is disabled for all courses. If you want someone with an existing Mason username to be able to access certain areas of your Blackboard site, without having to be enrolled in the course, you can enable guest access. A user without a Mason username can be provided a link to your course.

Guest Access provides limited course access to view course materials in specifically designated content areas. Certain areas of the course are never available to guests. The areas that cannot be accessed include communication areas such as discussion boards, journals, blogs, or wikis. The Grade Center, tests, surveys, and assignments are also unavailable to guests. If a guest needs access to these areas, you may wish to enroll them as a student in the course.

Once Guest Access is enabled only those enrolled as a guest or supplied with the guest link will be able to access your course.

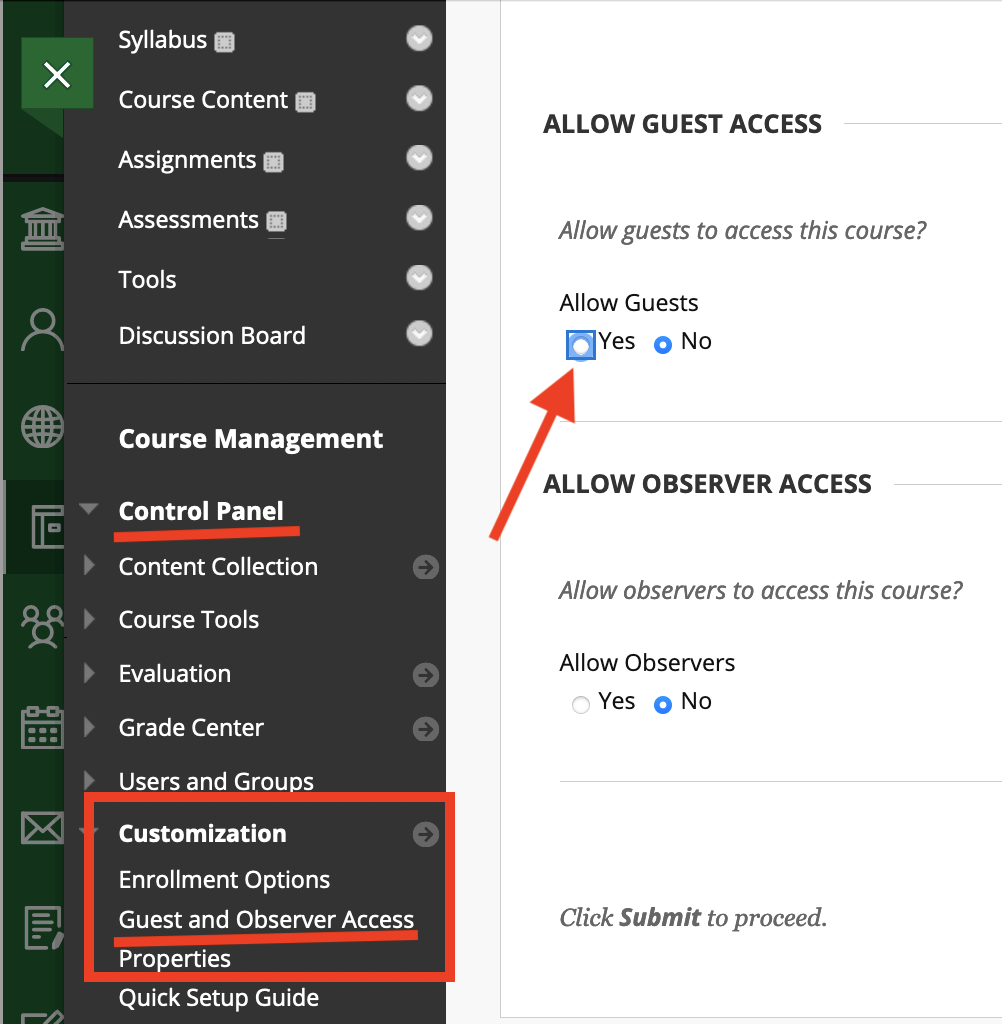
Step 1: Enabling Guest Access for a Site

  1. In the Customization section of your site's Control Panel, click Guest and Observer Access.
  2. Select Yes for Allow Guests.
  3. Click Submit.

Guest Access

Step 2: Set Guest viewing permission for the individual areas on the Course Menu

On the Course Menu, choose the downward arrows to the right of each area that you want guests to view. The setting will be either Deny Guests or Permit Guests. Choose Permit Guests.

Guest Access

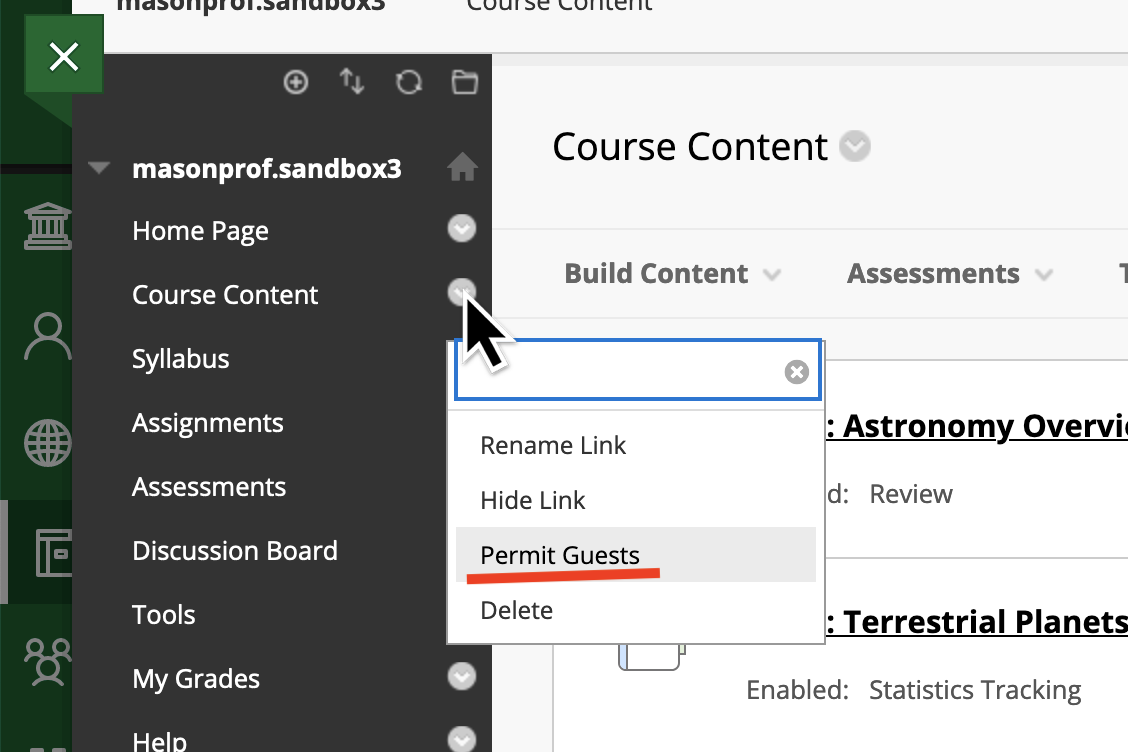
Note: if the Permit Guests option is not there, guests are not given an option to have access to this area (such as Discussion Board). The Permit Guests and Deny Guests options toggle the area permissions. If you see Permit Guests then the Deny Guests permission is currently activated. If you see Deny Guests, then the Permit Guests permission is currently activated.

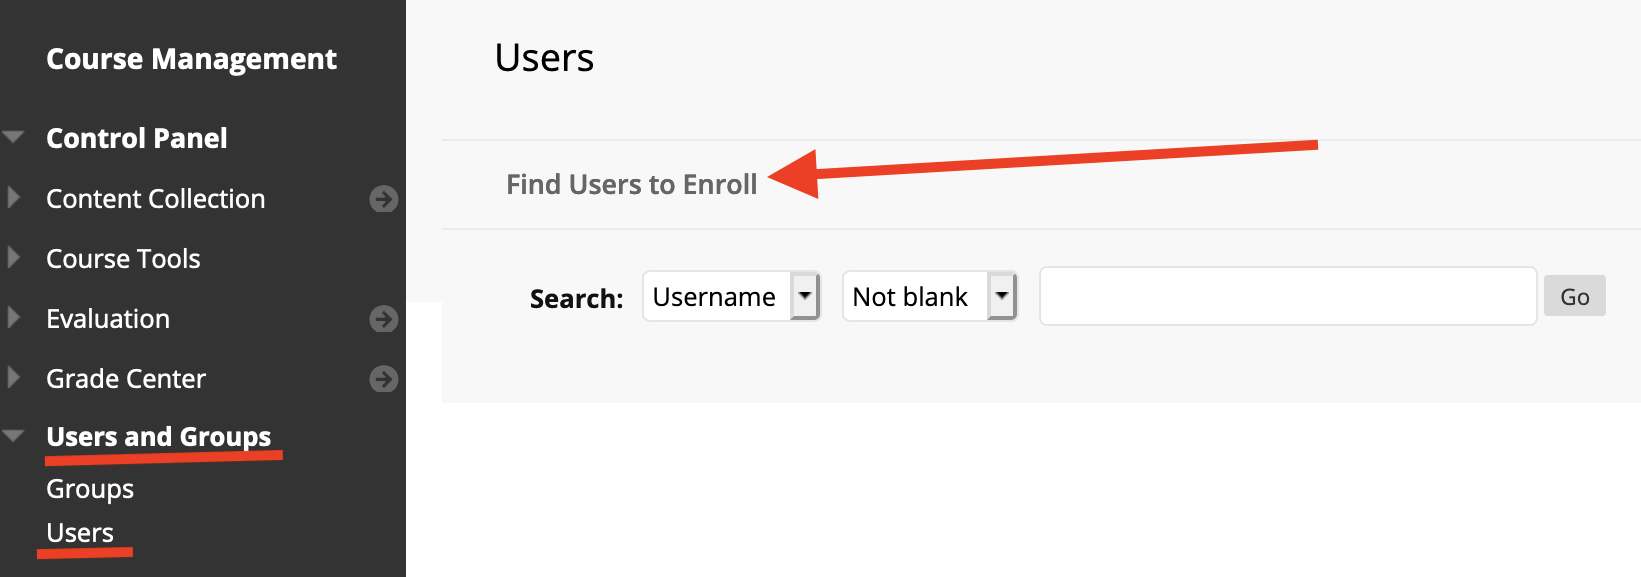
Step 3A: To Allow a Mason user to have Guest Access in your Course

  1. In the Users and Groups section of your site's Control Panel, click Users.
  2. Click Find Users to Enroll.
  3. Add the Mason UserID to the Username field.
  4. Change the Role to Guest.
  5. Click Submit to enroll the user.

Enroll User
Add Guest

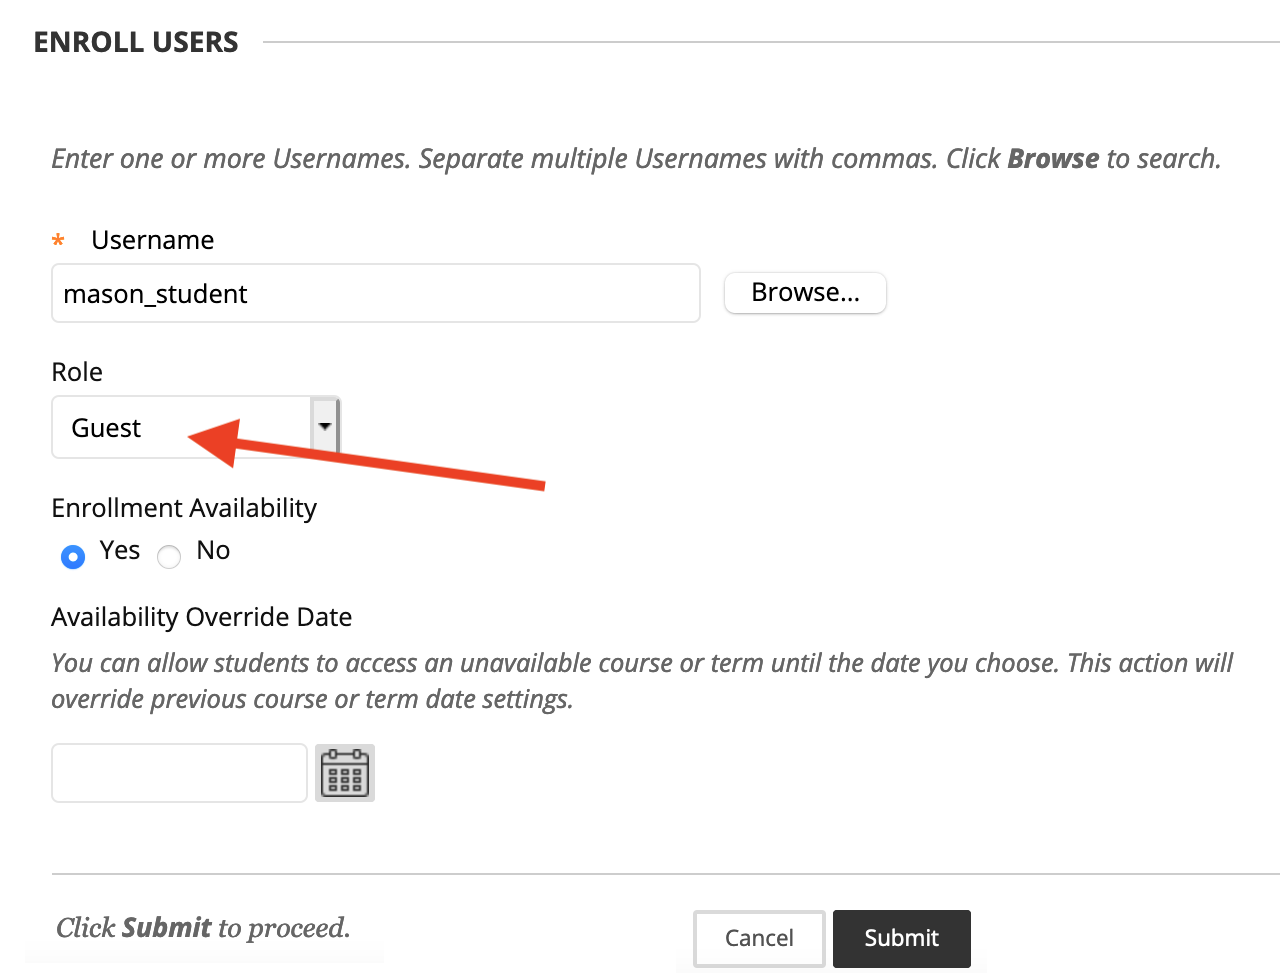
Now a Mason user can log in to Blackboard and access your course from their Courses page.

Step 3B: To share your course with non-Mason guests (public, no-login required)

Please note these steps have changed in January 2021, and all previous guest links will need to be updated.

  1. In the URL of any page in your Blackboard course, look for and copy the course id. It will begin with an underscore (_) and contain a series of numbers and a second underscore followed by an additional number.
    Course id
  2. Paste that course id at the end of the following URL. https://mymasonportal.gmu.edu/webapps/login/?action=guest_login&new_loc=%2Fwebapps%2Fblackboard%2Fexecute%2FcourseMain%3Fcourse_id%3D
    Example: https://mymasonportal.gmu.edu/webapps/login/?action=guest_login&new_loc=%2Fwebapps%2Fblackboard%2Fexecute%2FcourseMain%3Fcourse_id%3D_406320_1
  3. Provide this URL to the person(s) that need to access the course. Note: The only areas that will be accessible to your guests are the designated content areas (Step 2).

Note: Your course must be available (not private) for the Guest URL to work. It is a good idea to test the Guest URL yourself before sending it to users. Paste the URL into a different browser (or log out of your Blackboard account) and see what your guests will see.

Last modified: January 5, 2021

Previous

How to Generate Course Reports in Blackboard

Next

How to Combine Two Sections of Same Course in Blackboard

Related articles

  • How to Generate Course Reports in Blackboard
  • How to Use Inline Grading/Bb Annotate
  • Where can I find the full Blackboard help manual and training videos for students?
  • Why can't I log In to Blackboard Courses?
  • How to Update Your Blackboard Profile and Photo

Get Started at Mason

Whether you are a student, faculty, staff member, or a guest visiting the Mason campus, we have resources to help get you started.

Read More

Quick Links

Patriot Pass Password Reset
Submit a Ticket
Track a Ticket
PuTTY
Cisco AnyConnect VPN

Read More

Explore IT Services

A B C D E F G
H I J K L M N
O P Q R S T U
V W X Y Z #

© 2022 George Mason University
4400 University Drive
Fairfax, Virginia 22030

Latest tweet

George Mason ITS Follow

The official Twitter page for George Mason University's Information Technology Services

GeorgeMasonITS
George Mason ITS @georgemasonits ·
23 Jan

After October 14, 2025, Microsoft will no longer provide security updates or support for Windows 10 systems. As a result, all Windows 10 systems must be upgraded to Windows 11 or removed from the Mason network. Learn more ⬇️

https://its.gmu.edu/bulletins/microsoft-windows-11-announcement/

Reply on Twitter 1617560494176620547 Retweet on Twitter 1617560494176620547 Like on Twitter 1617560494176620547 Twitter 1617560494176620547
View All
ITS Support Center
703-993-8870
support@gmu.edu
live chat
Monday – Thursday, 8 a.m. – 9 p.m.
Friday, 8 a.m. – 5 p.m.
Saturday, Closed
Sunday, 1 p.m. – 9 p.m.
(closed Thursday 3 p.m. – 4 p.m. for a team meeting) Modified Winter Hours Monday –Thursday,
8 a.m. – 7 p.m. Friday, 8 a.m. – 5 p.m. Saturday & Sunday,
Closed Normal business hours will resume on Sunday, January 22 at 1:00 p.m.
  • Webmaster