The Active Directory Users and Computers (ADUC) snap-in application is automatically installed on department group administrators’ Windows computers. To connect to the ADUC snap-in from your Windows computer, you must be connected to the campus network or the Virtual Private Network (VPN) via the Cisco Secure Client.
Note: Instructions are for the Windows 10/11 operating systems. ITS is working on a permanent solution for macOS. For now, macOS users must utilize tools.mesa.gmu.edu to add and remove users from Patriot Drive Active Directory security groups.
Add Users to a Patriot Drive Shared Folder
Step 1
Connect to the Cisco VPN if not on campus
Step 2
Click Start > For the search field, type Active Directory Users and Computers > click Active Directory Users and Computers

Step 3
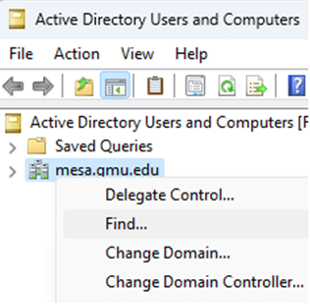
Click Yes to the User Account Control prompt > right-click on mesa.gmu.edu > click Find…
Step 4
For Name, enter the Active Directory group using this format:
DepartmentPrefix-SharedFolder-RW or RO
For example, the shared folder ccso.documents consist of the CCSO-documents-RW read/write group and the CCSO-documents-RO read-only group

Step 5
Click Find Now
Step 6
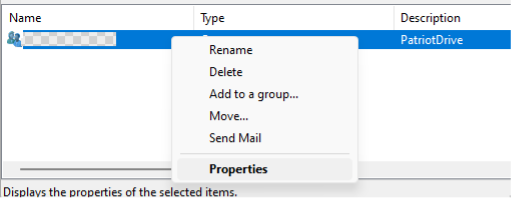
Right-click on the Active Directory group > click Properties
Step 7
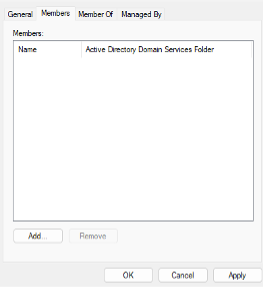
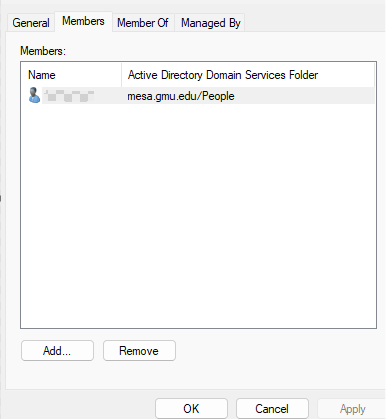
Click the Members tab > click Add
Step 8
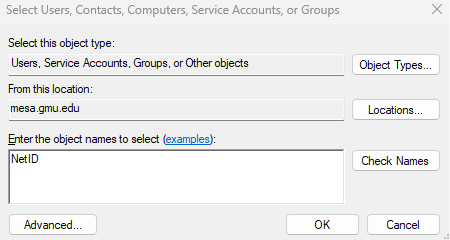
Enter the user’s NetID > click Check Names > click OK > click OK on the Properties window
Step 9
Close the Active Directory Users and Computers snap-in. The user you added may need to sign out and then sign back into the computer for new permissions to take effect.
Remove Users to a Patriot Drive Shared Folder
Step 1
Connect to the Cisco VPN if not on campus
Step 2
Click Start > For the search field, type Active Directory Users and Computers > click Active Directory Users and Computers

Step 3
Click Yes to the User Account Control prompt > right-click on mesa.gmu.edu > click Find…

Step 4
For Name, enter the Active Directory group using this format:
DepartmentPrefix-SharedFolder-RW or RO
For example, the shared folder ccso.documents consist of the CCSO-documents-RW read/write group and the CCSO-documents-RO read-only group

Step 5
Click Find Now
Step 6
Right-click on the Active Directory group > click Properties

Step 7
Click the Members tab > select a NetID > click Remove> click OK > click OK on the Properties window
Step 8
Close the Active Directory Users and Computers snap-in. The user you removed may need to sign out and then sign back into the computer for new permissions to take effect.
