Jump to
- Overview
- Authentication
- Highly Sensitive Data (HSD)
- Options for Your Synced Files
- Selecting Files and Folders Using MS Teams
- Sync Files and Folders Using SharePoint in a Web Browser
- Saving Files to Teams, OneDrive, and SharePoint via MS Office Applications
- Free Up Space, Move Items, or Delete Items from Synced Folders
- Unlinking Synced Folders
- Further Information
Overview
Microsoft (MS Teams), OneDrive, and SharePoint files are available 24/7 in the Microsoft Cloud. Access your MS Teams, OneDrive, and SharePoint files on the web. Additionally, quickly access online files using Microsoft’s OneDrive sync client, which gives quick access to files without opening a web browser. OneDrive is pre-installed on Windows 10 and Windows 11 machines and can be downloaded at Microsoft for Windows and macOS.
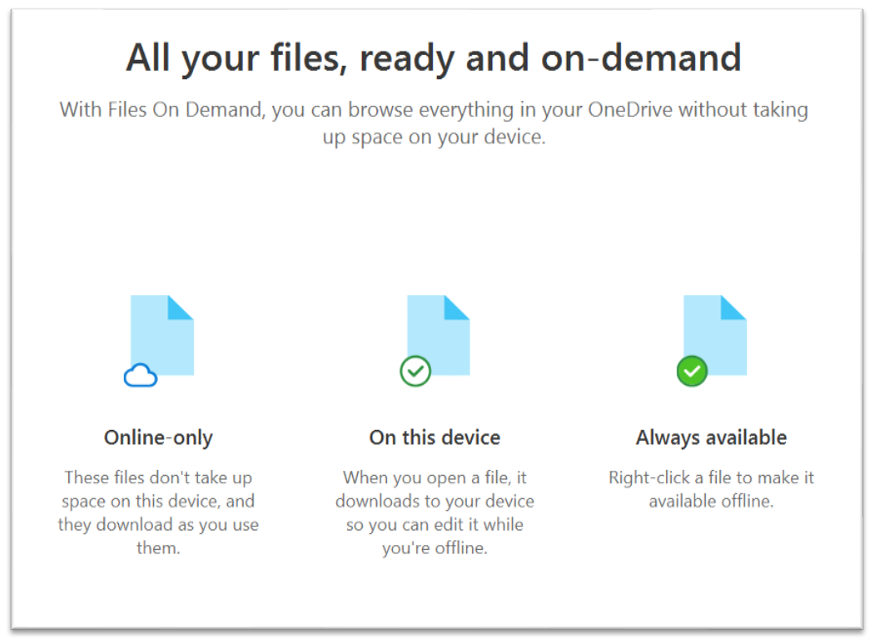
There are three states you may find your files: online only, on this device, and always available.
Chosen files or folders can be available online only, which are downloaded on demand. Files and folders will appear in File Explorer (Windows) or Finder (macOS) but will not download to your computer until they are opened to save space. More information about saving disk space with OneDrive files for Windows and saving disk space with OneDrive files for Mac.
(Warning: Deleting synced data on your desktop, if not done correctly, will delete the data from the Microsoft cloud. Suggestions are offered below in the section Free up Space, Move Items, or Delete Items from Synced Folders.)
You may also change the file's status to always available, and they will be stored online and on your device. OneDrive represents the status of OneDrive and your files via different icons. For an explanation of all OneDrive icons, see What do the OneDrive icons mean? When viewed in File Explorer or Finder, the current state of your synced files is indicated by the symbol displayed in the “Status” column and on each file’s icon as shown in the image below (Note the cloud icon, green checkmark, or white checkmark).

Authentication
If you are asked to sign in, enter your full Mason email address, including @gmu.edu. If prompted, choose “Work or School” account. Authenticate with Patriot Pass credentials and Two-Factor Authentication as required.
Highly Sensitive Data (HSD)
Persons at Mason who are authorized to work with and store Highly Sensitive Data (HSD) in Microsoft 365 services will not use the OneDrive sync client to access and work with HSD (including data from Teams, SharePoint, or other Microsoft 365 stored cloud data). When opening files in the native Microsoft apps (Word, Excel, and PowerPoint) you are also, by the nature of the technology, copying the HSD to your endpoint desktop (i.e., computer, laptop, mobile device, etc.). Word, Excel, and PowerPoint files should instead be edited in the Microsoft cloud via their respective Word for the web, Excel for the web, and PowerPoint for the web applications.
If there is a business requirement to work with HSD on the endpoint or use the native Office applications for HSD, you must request to have your endpoint assessed and controlled as a highly sensitive system. Special permission is required to ensure this data and endpoint are used in compliance with university, state, and federal standards, and that HSD is properly stored and secured. The IT Security Office (ITSO) must authorize the storage of HSD on endpoints. ITSO can help assess use cases and controls that will support business needs while maintaining security requirements.
Options for Your Synced Files
Teams and SharePoint files may be synced to your computer by choosing the files or folders you desire via the “Sync” or “Add shortcut to OneDrive” options. ITS recommends the “Sync” option as described below. ITS does NOT recommend the “Add Shortcut to OneDrive” when using the OneDrive sync client.
Syncing Group/Teams Files
Using the “Sync” option via the instructions below will set up a separate sync location on your computer for the shared library using the OneDrive sync client. This library follows the same configuration for downloading files on demand, with options to download all files or free up space as necessary. Changes made to the files will not be reflected until synced with the online versions (i.e., you are offline when making local edits). As an exception to this, some supported document types (.docx, .pptx, .xlsx) allow co-authoring to display real-time updates by editing the document with a live internet connection. More information at Work with synced files in File Explorer and Document collaboration and co-authoring in Word, Excel, and PowerPoint.
Selecting Files and Folders Using MS Teams
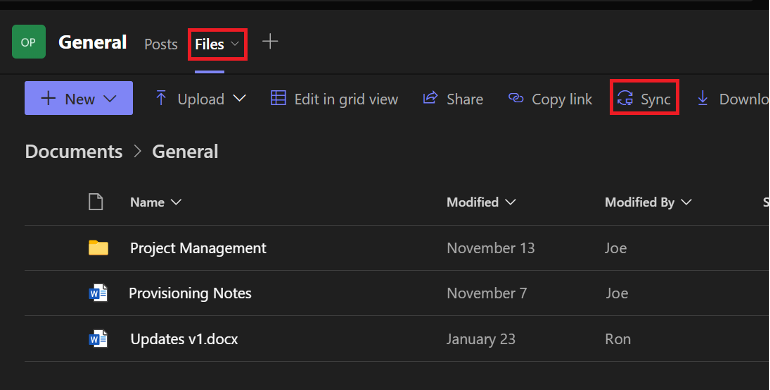
In MS Teams, navigate to the appropriate team and channel. In the Files tab, click the “Sync” button if you would like the contents to be synced through your computer’s OneDrive sync client. You may sync fewer files and folders by syncing sub-folders, and not all folders in a collection before choosing “Sync.”

Sync Files and Folders Using SharePoint in a Web Browser
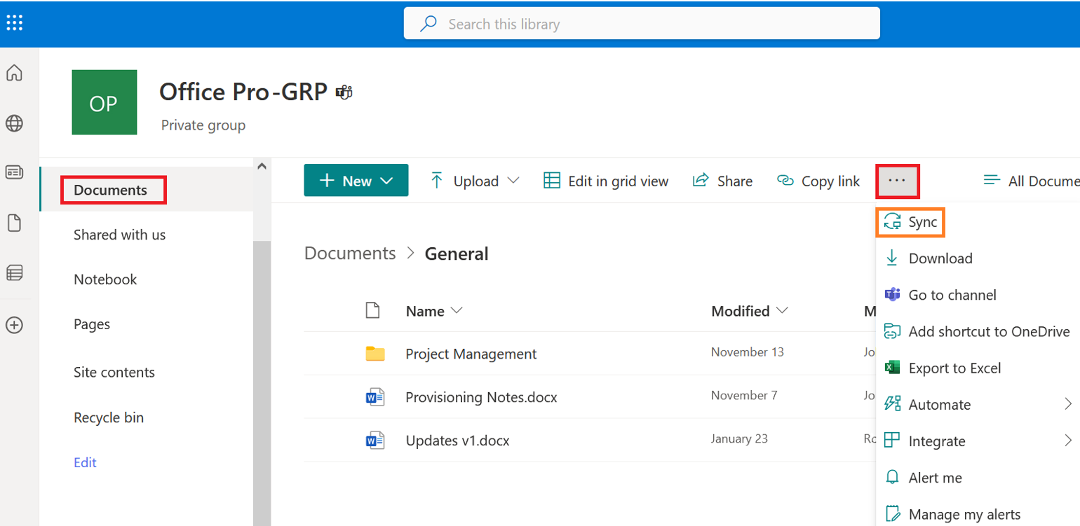
When saving files in a channel of MS Teams, you are saving the files in the SharePoint file system. Syncing SharePoint files in a web browser occurs similarly to when done via MS Teams as explained above. In some cases, you may prefer to use a web browser instead of MS Teams to sync files. If using a web browser, start by navigating to the SharePoint or MS Teams site in a web browser. In the Documents section (the “Files” section in MS Teams), choose “Sync” if you would like the contents to be synced through your computer’s OneDrive sync client. You can sync fewer files and folders by drilling down into the folders before choosing “Sync”.

Saving Files to Teams, OneDrive, and SharePoint via MS Office Applications
When saving files using modern Microsoft Office applications, users may click either their “OneDrive” or “Sites” (aka SharePoint Sites). Clicking one of the two options will result in the most recent choices/file locations appearing in the Save window to the right. This will include locations in MS Teams, OneDrive, and SharePoint.

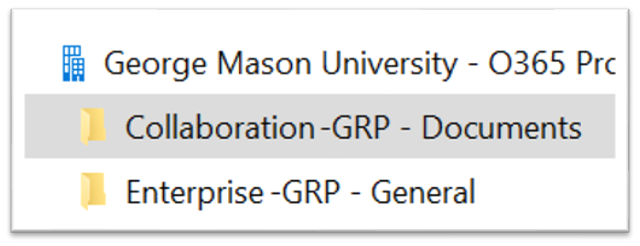
Clicking Browse allows you to save files to the previously Synced libraries and subfolders found in Explorer/Finder as shown below.

Free Up Space, Move Items, or Delete Items from Synced Folders
Warning: Deleting synced data on your desktop, if not done correctly, will delete the data from the Microsoft cloud.
If you are looking to free up space on your computer, right-click a file or files and select the option to “free up space” versus deleting synced files. This will remove the files from your device but keep them in the original online location, such as MS Teams, SharePoint, or OneDrive. You can also update which folders you are syncing if you do not need them in this local view anymore. If you have synced multiple locations (e.g., various Teams and your OneDrive), you may stop syncing on the individual Teams spaces if you no longer need them through the sync client.
If you want to keep a separate local copy of a file, copy it to a local folder not in your OneDrive sync folder. Delete the original from the sync folder if desired. This will also delete the file from OneDrive/Teams/SharePoint unless you have un-linked OneDrive or stopped syncing the containing folder as described below (Warning: Deleting synced data on your desktop, if not done correctly, will delete the data from the Microsoft cloud).
Use the “free up space” option to make sure all your synced files are online only. Then un-link OneDrive or stop syncing the relevant team space. All “online only” files should disappear without any local deletion needed. More information for saving disk space with OneDrive Files On-Demand for Windows and macOS.
Unlinking Synced Folders
Warning: Deleting synced data on your desktop, if not done correctly, will delete the data from the Microsoft cloud.
If you need to un-link OneDrive but keep a local copy of synced files, moving those files from the sync folder is the best method. If you choose to leave them in this folder but need to delete them locally later and not in OneDrive, un-link the space before any local deletions. Run a test with a single file. Check OneDrive via a web browser to ensure it still exists in OneDrive.
** Ensure the OneDrive right-click actions to free up space or manage access, etc. are no longer present on files you intend to delete locally but leave in OneDrive. **
If you inadvertently deleted files, that deletion should sync to your OneDrive Recycle Bin, assuming those files were syncing. Recycled OneDrive items will remain in the recycling bin for 93 days. You can also check your local trash or recycling bin if the file was previously downloaded. If the deleted file was online only but showing through the sync client, check OneDrive’s recycle bin through your web browser. More information at Restore deleted files or folders in OneDrive.
Further Information
Please see Microsoft 365 support for more information, including videos, for Windows and macOS. More articles are available for Windows and Mac on the Microsoft support page for Troubleshooting OneDrive Sync.
