What is an Attribute? | What is an Attribute Form? | How to View Attribute Forms | How to View Attribute Forms | How to Display Different Attribute Forms in a Grid Report | To Display Different Attribute Forms in a Grid visualization for a Dossier
What is an Attribute?
In MicroStrategy, an Attribute represents business concepts such as student, course, employee, fund, and organization. They provide the context on which to report and analyze business facts such as average GPA, total earned credit hours, and salary amount.
In a Grid report’s Report Objects panel, attributes are indicated with an aqua-colored diamond ⯁ before the attribute name.

What is an Attribute Form?
Attribute forms enable the grouping of multiple “pieces” of related information within a single attribute. Each attribute form is simply another column of data included with the attribute on your report. An Attribute must have at least one form, typically named ID (Identifier). Many attributes have two forms, typically named ID and DESC (Description).
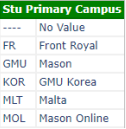
Here is an example of the Stu Primary Campus attribute with two attribute forms: ID and DESC.
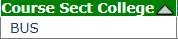
Another example is the attribute Course Section College. It has three forms: ID, SHORT DESC, and DESC. For the School of Business, the values for each form are BU, BUS, and School of Business.

How to View Attribute Forms
In a Grid report’s Report Objects panel, on the left side of each attribute is a triangle icon. Clicking this icon expands the attribute and displays all the available attribute forms.
The forms already displayed on your report are listed in gray, while the forms still available to include on your report are listed in black. For example, when the Course Sect College attribute is placed on a report, every attribute form except ID displays by default.
Similarly, in a Dossier’s Datasets panel, you’ll see attributes listed in the same fashion. However, they do not expand to show attribute forms.

Although an attribute has many forms, every form may not display on your report. For Course Section College, perhaps only the DESC form displays by default. Fortunately, in a Grid report or a on a Grid visualization in a Dossier, you can choose not only which forms to display but also the order they display.
How to Display Different Attribute Forms in a Grid Report
Step 1
Right-click the attribute header (the name of the attribute).

Step 2
From the menu, point to Attribute Forms. On the list of available forms, select any unchecked forms (a check mark indicates the form is displayed).

How to Display Different Attribute Forms in a Grid Visualization for a Dossier
Step 1
Right-click the attribute header and click Display Attribute Forms.

Step 2
On the list of available forms, a check mark indicates which are displayed. Select the checkbox for each form you wish to display and clear the checkbox for any no longer need to be displayed.

Step 3
Click OK.

To learn how to display or hide attribute form names, see How to Display or Hide Attribute Form Names on a MicroStrategy Report.
.