• Live Chat
  • Report an IT Security Incident
  • Request Help
  • Help & Support
    • Request Help
    • Live Chat
    • Track a Ticket
    • Knowledge Base
    • Getting Started
    • Working/Learning Remotely
    • Contact Us
  • Service Catalog
    • Accounts & Access
    • Communications & Collaboration
    • Computers & Software
    • Data, Reporting & Analytics
    • Network & Internet Services
    • Professional Services
    • Research Computing
    • Teaching & Learning
    • University Applications
    • Web, Servers & Hosting
  • About ITS
    • Our ITS Team
    • Strategic Plan
    • Annual Reports
    • Awards
    • Student Employment
  • Working with ITS
    • Architectural Standards Review Board
    • Banner Admin
    • Business Intelligence
    • Data Governance
    • Enterprise Data Integration Services (EDIS)
    • GMU-TV
    • IT Business Analysis
    • IT Security Office
    • Projects & Project Management
    • Technical Business Solution Intake Request Process
  • Alerts & Outages
    • Unplanned Outages
    • Phishing Alerts
    • Maintenance
    • After Action Reports
    • Archives
    • ITS Alerts Sign Up
  • News
    • Bits & Bytes Signup
    • Bits & Bytes Submissions
    • Spotlights
    • Bulletins
George Mason University
  • Live Chat
  • Report an IT Security Incident
  • Request Help
X Hide

Information Technology Services

Skip to content
  • Help & Support
    • Request Help
    • Live Chat
    • Track a Ticket
    • Knowledge Base
    • Getting Started
    • Working/Learning Remotely
    • Contact Us
  • Service Catalog
    • Accounts & Access
    • Communications & Collaboration
    • Computers & Software
    • Data, Reporting & Analytics
    • Network & Internet Services
    • Professional Services
    • Research Computing
    • Teaching & Learning
    • University Applications
    • Web, Servers & Hosting
  • About ITS
    • Our ITS Team
    • Strategic Plan
    • Annual Reports
    • Awards
    • Student Employment
  • Working with ITS
    • Architectural Standards Review Board
    • Banner Admin
    • Business Intelligence
    • Data Governance
    • Enterprise Data Integration Services (EDIS)
    • GMU-TV
    • IT Business Analysis
    • IT Security Office
    • Projects & Project Management
    • Technical Business Solution Intake Request Process
  • Alerts & Outages
    • Unplanned Outages
    • Phishing Alerts
    • Maintenance
    • After Action Reports
    • Archives
    • ITS Alerts Sign Up
  • News
    • Bits & Bytes Signup
    • Bits & Bytes Submissions
    • Spotlights
    • Bulletins

Knowledge Base

Home > Help & Support > Knowledge Base > Email & Collaboration > Office 365 > Resource Account > How to Access your Resource Calendar

How to Access your Resource Calendar

Below are directions on how to access your resource account. To see the instructions, simply click on the subject you are interested in to learn more.

  • Resource Account Access via Outlook on the Web
  • Resource Account Access via Outlook 2019 on Mac

Resource Account Access via Outlook on the Web

You must be the Resource Account Requester or added as an Owner to open via OWA.

Step 1

Log in via office365.gmu.edu as you normally would.

Step 2

Click the profile picture in the top right corner. Select Open another mailbox... from the list.

Step 3

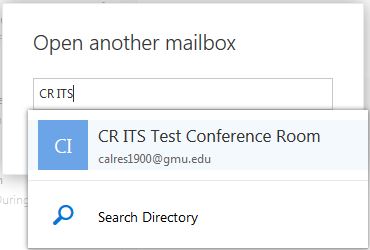
Enter the resource name (or email address if the resource is not in the global address list) in the Open another mailbox field.

Step 4

The resource account will open in a new browser tab.

Step 5

When finished worked with the resource, close the browser tab. Clicking sign out will actually sign you out of your personal account as well.

Resource Account Access via Outlook 2019 on Mac

Adding the resource account to the Outlook for Mac configuration is similar to adding a delegate to the account.

Step 1

Open Outlook for Mac.

Step 2

Select Outlook Preferences from the menu list.

Step 3

Select Accounts from the Outlook Preferences Options.

Step 4

Select the account that has full access rights to the Resource (typically this would be the individual’s account; however, the individual may have more than one account set-up in Outlook).

Step 5

Select Advanced… in the bottom right corner.

Step 6

Choose Delegates from the choices at the top of the page.

Step 7

Click + to add a delegate to the “People I am a delegate for” list.

Step 8

Enter the information for the Resource and select OK to add the person to the list.

Step 9

Click OK to save the changes.

Step 10

Click the red x to exit the Preferences area.

Step 11

The resource account will now show in the left column with the other mailboxes.

Step 12

To send an email on behalf of the resource (assuming permission to do so has been granted), select the new email button and make sure that the From address has the correct one selected.

Step 13

Navigate to the Calendar. The Resource calendar will show up in a “Shared Calendar” list.

Step 14

To display the calendar, check the box next to the name. To hide it from view, merely deselect the box.

Last modified: September 3, 2021

Previous

What is a Resource Account?

Next

How to Manage your Resource Calendar

Related articles

  • What is a Resource Account?
  • How to Manage your Resource Calendar

Get Started at Mason

Whether you are a student, faculty, staff member, or a guest visiting the Mason campus, we have resources to help get you started.

READ MORE

Quick Links

Patriot Pass Password Reset
Create a Ticket
Track a Ticket
PuTTY
Cisco AnyConnect VPN

READ MORE

Explore IT Services

A B C D E F G
H I J K L M N
O P Q R S T U
V W X Y Z #

I T S Logo

© 2024 George Mason University
4400 University Drive
Fairfax, Virginia 22030

Follow Us
location pin for in-person IT support   @GeorgeMasonITS
location pin for in-person IT support   @georgemasonits
ITS Support 24/7
   703-993-8870
   Live Chat
  • Webmaster
X

ITS Technical Support Now Available 24/7

Students, faculty, and staff can receive technical support any time—day or night, on weekends, and even holidays. If you need IT help, call 703-993-8870 anytime or create a request ticket.