
This guide will cover the use and features of the Vonage Desktop App. To download the application, see:
Configure Application Settings
The desktop application is the preferred method for configuring your phone settings.
Access Settings
Once logged into the desktop app:
- Click your Profile icon (top-left corner)
- If no profile image is set, your initials will appear
Profile Settings
- Profile Picture: Hover over the profile icon to edit (pencil icon) or delete (Trash icon).
- Emergency Location: Do not change. Always use a desk or mobile phone for 911 calls. You should see “National Emergency Call Center NECC,” which will route you to a call center where a dispatcher will determine your exact location.
Call Management Settings
MS Teams Softphone Integration
Note: Once your Vonage account is linked to MS Teams, it is not possible to disable calls without disabling all other notifications. Calls may continue to ring even if the MS Teams app is closed.
- If linked to MS Teams, calls will ring in Teams by default. and can be answered via the pop-up notification
- To stop calls in Vonage: toggle “Disable Calls” in your profile
- The desk phone ringer can be muted using the volume button
Note: MS Teams call handling depends on your Microsoft license. Contact ITS if you are unable to place calls via Teams.
Vonage Softphone Application
To receive calls in Vonage, ensure:
- Mute All Devices, Disable Notifications, and Disable Calls are toggled off
- To silence ringing but still manage calls: Go to Settings → Application → Notifications and uncheck “Play sound for incoming calls.”
Mute & Notifications
- Mute All Devices: Sends all calls to voicemail
- Disable Notifications: Stops pop-ups, but calls still ring
Call Settings
- Minimize the call screen by default
- Keep the dialpad open
- Disable incoming calls (This is the same as the “Disable Calls” setting mentioned above)
- Set an automated message for Missed calls (Note: The text for this message cannot be edited. SMS only works with external numbers)
Audio
Use the drop-downs to select from the microphone and speaker options built into or connected to your device.
Blocking Numbers
- To block numbers via Calls, SMS, or Fax history, click the ellipsis in your recent history and select “Block.” Blocking a number through one of these methods will stop that number from contacting you in all three methods. For as long as the number is in your recent history, you can follow the same method to unblock the number.
- To manage your blocking rules, navigate to settings and then “Call Blocking.” From here, you can block additional numbers or entire area codes by clicking “Add Rule.” To remove a call-blocking rule, click “Bulk Edit” and select the checkbox for the rule, then click the Trash icon at the bottom of the screen.
Voicemail Settings
- It is recommended that you use the Vonage softphone application to adjust your voicemail settings.
- From here, you can disable voicemail entirely, configure voicemail to email, and change your greetings.
Note: Using Name Greeting will break other voicemail greetings.
Set voicemail PIN
Under "Voicemail Enabled," you can set your voicemail PIN. You will use your PIN when accessing your voicemail from your desk phone, any phone outside of your email, or the Vonage Desktop App.
Note: Your voicemail PIN must be set to access messages with Vonage.
Greeting Options
- Play: Listen to current greeting
- Record: Select Record and enter the number you would like to be reached at. When you answer the call, you will be prompted to say the message, then press # and follow the commands to save or re-record.
- Download/Upload: Save or reuse greetings
Out-of-Office Greeting
- Record your greeting by clicking the toggle in the “Out of Office Greeting” settings box, then follow the "Greetings" steps listed above.
- Remember to save your changes and to turn off your out-of-office greeting when you return to work.
Exiting Voicemail
- This feature gives callers the choice to be forwarded to another number, such as your department's main line or a colleague, or stay on the line to leave a message.
- If you use this feature, be sure to include the instructions to press 4 in all voicemail greetings for callers.
Using the Application
Manage Calls
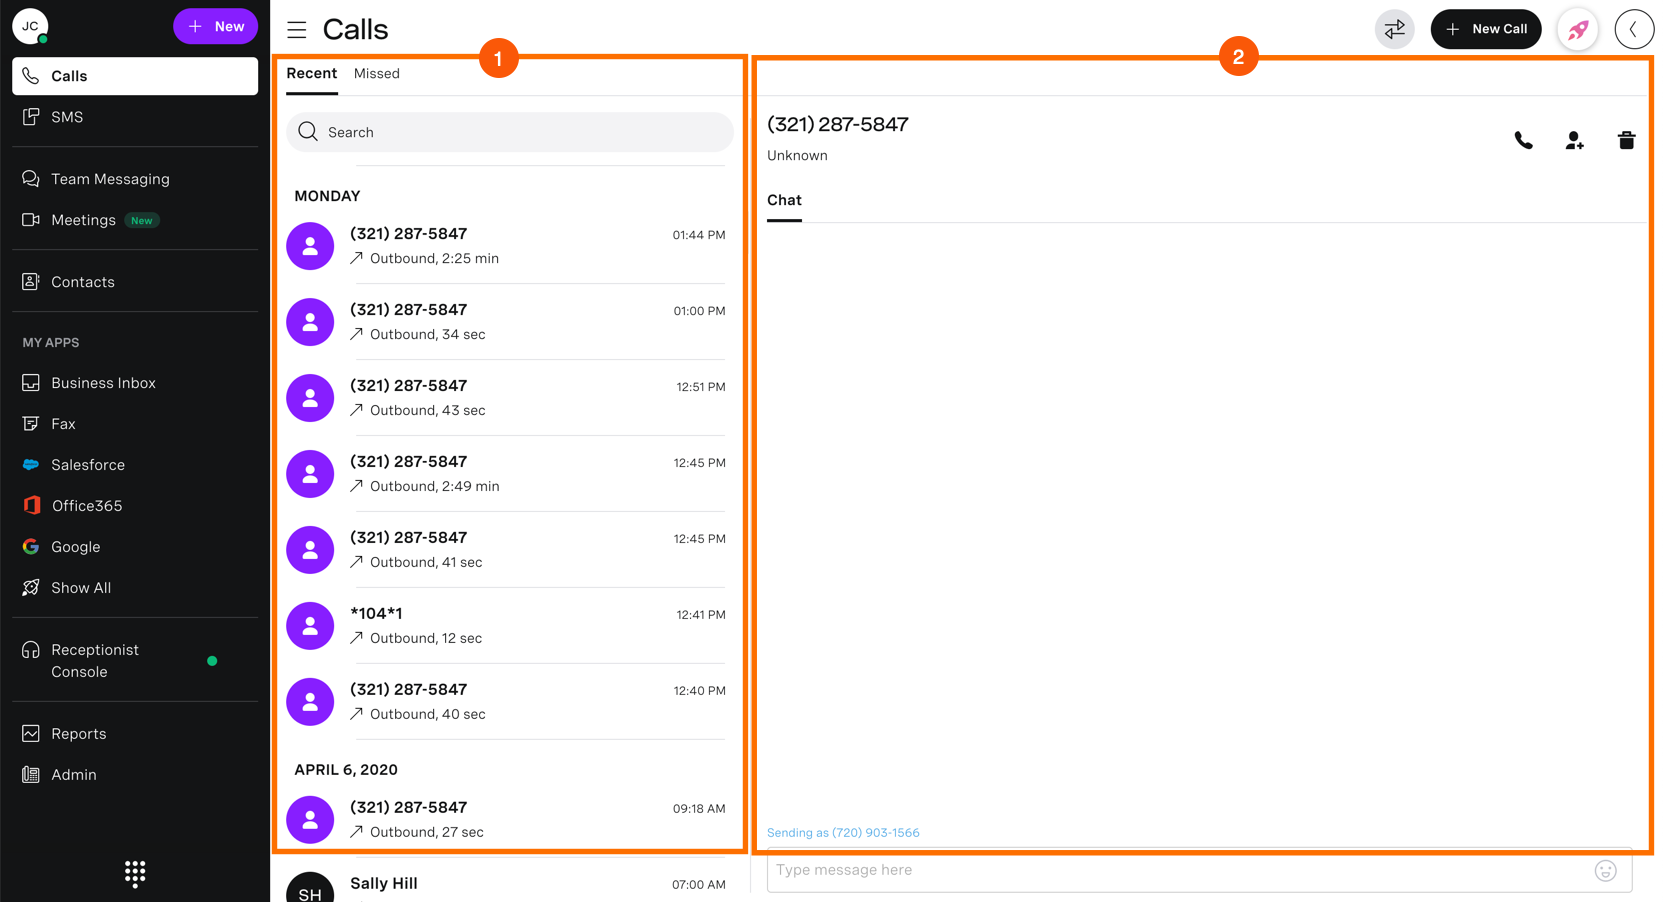
Upon sign-in, the Calls page will be the first page you see. The Calls page is broken into two distinctive areas.
- The first area is the Call Log window, where you can view all incoming, outgoing, and missed calls.
- The second section of the Calls page is where Caller Information is located. The information displayed will change depending on the caller you select and will show all available data for the selected caller.
Place a Call
From the Calls Page:
- Click New Call to make the dial pad window appear
- Enter a valid extension or 10-digit number
- Click Call
- The call will now be placed and shown at the top of the dashboard screen
From the George Mason Directory:
- Click New Call to make the dial pad window appear
- Click the Directory icon (The dial pad will disappear and be replaced with your Contact list)
- Search for a contact with the search field or locate it manually from the list
- Once the contact is found, hover over their name and click the blue phone icon to complete the call
End a Call
To stop an active call, press End Call, which is a red circle with a handset.
Park/Unpark a Call
To park a call while on an active call:
- Press the Park icon.
- The call will now be displayed within the table of the Parked Calls area on the Receptionist console.
To retrieve a parked call:
- Click Answer next to the parked call, or, from the dial pad, dial *104 and listen to the prompts.
Transferring Calls
Blind Transfer
A Blind (or unannounced) Transfer occurs when you transfer a call to someone else without announcing the call first. To conduct a blind transfer, while on an active call:
- Click Transfer
- Select Blind Transfer
- From the Contact panel, select the recipient you wish to transfer to
- Click Transfer. Your call will now be transferred
Transfer from Dial Pad
You can also transfer to another recipient via the Dial Pad.
From the Transfer To window:
- Click the Dial Pad icon
- Enter the valid extension or 10-digit number
- Click Dial
- Your transfer is now complete
Consulted Transfer
A Consulted (or announced) Transfer is performed when you announce the call to the recipient before transferring the call.
To conduct an attended transfer while on a call:
- Click Transfer
- Proceed to select an Attended Transfer
- From the Contact panel, select the recipient you wish to transfer to
- Click Call
- When the party answers, announce the call and click Transfer one last time
- Your call will now be transferred
Transfer to another recipient via the Dial Pad:
- From the Transfer To window, click the Dial Pad icon
- Enter the valid extension or 10-digit number
- Click Dial
- When the party answers, announce the call and click Transfer one last time
- Your call will now be transferred
Manage Your Voicemail Messages
Access your Voicemail
To access your voicemails, click the Voicemails tab from the menu on the left. This page is broken into two separate areas.
- The first area is your voicemail window, which is where your voicemails are stored, usually by date in chronological order.
- The second area houses all the voicemail information and is found to the right of the voicemail window.
Listen to a Voicemail Message
- Select the message in the voicemail window (message information will display to the right)
- Click Play
- Your message will now be played
Delete a Voicemail Message
- Click the Trash icon
- A verification will appear to confirm your deletion
- Click Delete
- Your message will now be removed from the voicemail section
Email a Voicemail Message
- Click the Envelope icon
- Enter a valid email address
Download a Voicemail Message as a .wav File
- Within the information window, click Download
- Save the file to your computer
Manage Your Contacts
Access Your Contacts
To access your contact directory, click the Contacts tab. This page is broken into two separate areas. The first area is your contact list window, which gives access to the Directory contact list and your contact list. The second area houses all the contact information and is found to the right of the contact list window. This section will change depending on the selected contact.
Add a New Contact
- Click New Contact in the top right
- The Add Contact window appears
- Insert the necessary information in the appropriate fields
- When finished, click Save
- You should now see your contact listed in the My Contacts table
Add a Contact as a Favorite
To Favorite a contact, click the star icon either next to their name or within the contact information screen. Once clicked, the star will change to solid yellow and will now be in your Favorites list.
Remove a Contact from Favorites
Navigate to your contacts list and click the Star icon next to their name. You will see it has been removed when the star reverts to its outlined form.
Delete a Contact
Note: Contacts can only be deleted from the My Contacts tab
- While in My Contacts, select a contact and click the Trash icon to the right of the contact
- A verification box will appear to confirm your deletion
- Click Delete
- Your contact will now be deleted
Delete Multiple Contacts
- Click the Trash icon within the My Contacts window
- Select the contact or contacts you want to delete by selecting the checkboxes next to each contact
- When finished, click Delete
- A verification box will appear to confirm your deletion
- Click Delete. Your contacts will be deleted
Use SMS Texting (Short Message Service)
SMS messaging in Vonage can only occur 1:1.
Send an SMS Message
- Navigate to and click the SMS icon on the left-hand side of the application, followed by clicking New Message in the top right corner
- Enter the recipient’s name or a number and click the green arrow icon
- Enter your message within the Type Message Here field and press Enter to send the message
Sending URLs in SMS
To ensure message delivery, it is recommended to only send links found on an official George Mason website. Only send George Mason-branded URL shorteners or direct branded URLs. University-branded URLs can be requested through Team Dynamix.
Delete an SMS Message
To delete an SMS message:
- Navigate to and click the SMS icon on the left-hand side of the application
- Select the message you want to delete and click the Trash icon in the upper right
- A verification box will appear to confirm your deletion
- Click Delete to remove the SMS message
Delete Multiple SMS Messages
To delete multiple SMS messages:
- Navigate to and click the SMS icon on the left-hand side of the application
- Click the Trash icon within your SMS text window
- Select the message or messages you want to delete by checking the checkboxes next to each, and then click Delete
- A verification box will appear to confirm your deletion
- Click Delete to remove the messages
Manage Fax
Send a Fax
- Select Fax from the column on the left-hand side
- Click New Fax and select the appropriate number in the Sending As field
- Enter the recipient’s name or number in the search field, then select the recipient from the list below and click Next
- Attach the document by dragging files to the window or browsing for them on your computer
Note: If you want to include a cover page, make sure the Use Cover Page checkbox is selected, and the information is placed correctly in the cover page information fields. If you do not wish to use a cover page, leave this box unchecked. - Locate the file on your computer and click Open. Once uploaded, your data will appear in the box
- Click Preview to view the message before sending it
- After reviewing the attachment, click Send
Your fax will now be in pending status. If the fax is successful in transmission, you will see it in the fax message window.
Manage Reports
Download a Report
To access a report
- Navigate to the Reports section on the left-hand column
- Select the type of report you want and click Download for the drop-down menu to appear
- Choose PDF or CSV for the file type
- A Save As dialog box will appear, where you can modify the file name and save the file to your computer
Email a Report
- Navigate to the Reports section on the left-hand column
- Select the type of report and click the Email icon to email the current report to recipients
- In the email dialog box, enter email addresses separated by commas and a short message if desired
- Click Send, and an email with the report will be sent to the recipients
Print a Report
- Navigate to the Reports section on the left-hand column
- Select the appropriate report
- Click the Printer icon for a print dialog box to appear (You can print the report you are currently viewing)
Configure Call Flow Options
Access Call-Flow Options
Self-serve call flow options can be accessed in the:
- Vonage Desktop or Web App: To customize your call-flow, navigate to your profile icon and select Settings, then Call Forwarding.
- Vonage Mobile App: To customize your call-flow, navigate to Settings, Call Settings, then Call Forwarding.
Note: If you are forwarding calls to a cell phone or other external number, to ensure the call flow works properly, the number of rings set should not exceed 4 rings.
Foward Options
Forward to Voicemail
When voicemail is selected, you will configure the number of rings and ring time that occurs before a call is sent to voicemail. (The number of rings set should not exceed 4 rings) Save your changes before exiting.
Additional voicemail settings can be found under the "Voicemail" section of Settings.
Forward All Calls
This setting forwards all calls to another number. To select a number, navigate to “Users” and enter the extension or person’s name in the search bar. You may also manually add the full 10-digit number in the text box field for “Phone Number.”
The Caller ID can be changed to another George Mason number in the drop-down menu. This is the number that will appear on the phone when calls are forwarded from your extension. It is recommended that you select “Originating Number” (the number of the caller) or your extension.
Save your changes before exiting.
Follow Me
Follow Me sets additional numbers that will ring when you are unable to answer your phone.
- Up to five numbers can be added, and ring time must be selected for each
- Any numbers used that are not internal to the Vonage system should be reserved for the final selection
- The number of rings is set to 4 or fewer
- To continue to receive calls first, the first number selected must be your extension. Subsequent numbers will ring if the previous number does not answer
To select a number:
- Navigate to “Your Numbers” and enter the extension or person’s name in the search bar. You may also manually add the full 10-digit number in the text box field for “Phone Number.”
- Select the number of rings
- Additional numbers can be selected using “Add Another Rule”
Select the extension you want to receive the voicemail. If the number you wish to assign is not available for selection, it is recommended to select “This Extension’s Voicemail,” then use the Exiting Voicemail feature, and record a voicemail greeting with instructions for the caller to press 4.
Under the Caller ID option, you will select a number from the drop-down menu. This is the number that will appear on your phone when calls are forwarded from your extension. It is recommended that you select “Originating Number” (the number of the caller) or your extension.
Save your changes before exiting.
Simultaneous Ring
The Simultaneous Ring feature rings multiple numbers at the same time.
- Up to five numbers may be selected
- Additional numbers can be selected using “Add Another Rule”
- Ring time is set once and applied to all numbers. It is recommended that the number of rings be set to 4 or fewer. If the number of rings in your Vonage settings is longer than it takes for the forwarded device to send the call to their voicemail, then the call flow will stop at this point.
Under the Caller ID option, you will select a number from the drop-down menu. This is the number that will appear on the phone receiving the call when calls are forwarded from your extension. It is recommended that you select “Originating Number” (the number of the caller) or your extension.
If a call is unanswered, it will be sent to your voicemail. If the call is answered, it will stop ringing for all other phones.
Calling Feature Availability
Calling Features Availability and Functionality
The following chart illustrates the availability and functionality of calling features, as well as the options that provide the best user experience.
| Features | Vonage Desktop App | Desk Phone | MS Teams App* |
|---|---|---|---|
| Manage Softphone Ringing | |||
| Manage Softphone Call and Notification Settings | |||
| Select Your Ringtone | |||
| Set Voicemail PIN | |||
| Change Voicemail PIN | |||
| Record and Manage Voicemail Greetings | |||
| Make a Call | |||
| Answer a Call | |||
| Transfer a Call | |||
| View Call History | |||
| Unified Collaboration Experience | |||
| Manage Call Blocking | |||
| Manage Call Flows | |||
| Send and Receive SMS Messages** | |||
| Save SMS Message Content | |||
| Send and Receive eFax | |||
| Multiple Line Appearances |
Key
![]() Indicates the best user experience
Indicates the best user experience
![]() Indicates where a feature is available and appropriate to use
Indicates where a feature is available and appropriate to use
![]() Indicates where a feature is unavailable or does not function as needed
Indicates where a feature is unavailable or does not function as needed
* The Vonage calling integration with MS Teams is dependent on the MS license type assigned to a particular user
** The Vonage Business Communications (VBC) App for MS Teams must be installed to enable this feature