
This guide covers how to use your Yealink Model T33 phone.
Jump to
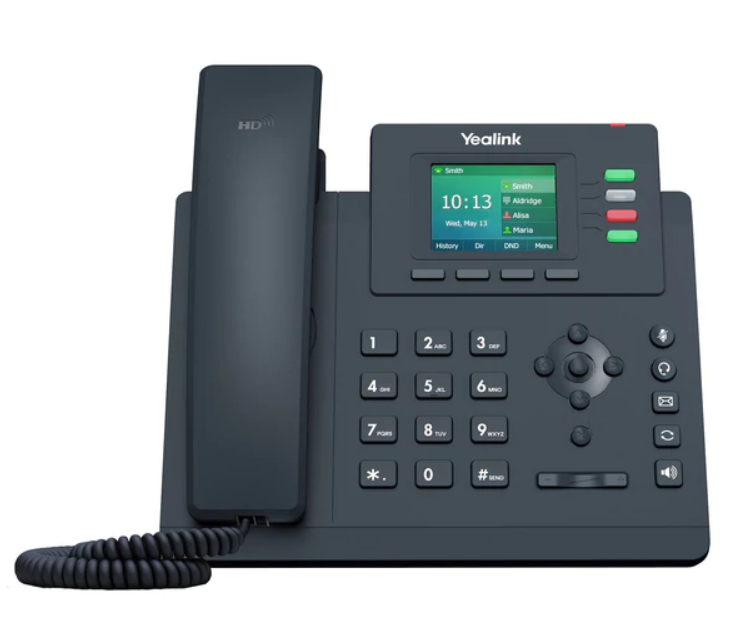
Device Overview
Line Keys
The Line Keys indicate the status of your lines and associated activity. The backlighting informs you when a line is idle, ringing, in use, on hold, or disconnected altogether. The T33G phone has 3 line keys, while the fourth key acts as a pagination button to switch between 4 pages of programmable line keys. The T31P phone has 2 programmable line keys.
Soft Keys
The Soft keys perform the functions that appear directly above them on the display. Their functions are context-sensitive, which means that the soft keys change depending on your current activity. For example, if you are conferencing, the soft keys display functions related to the conference function.
Navigation Keys
By pressing left or right, up or down, you can scroll through the options and lists on the display using the Navigation Arrows. To select an item, press the button in the center of the four-way Navigation Arrows or the checkmark button. To cancel or back up to a previous screen, press the X button below the down navigation arrow. These keys also function as a fast way to navigate to many functions, such as placed calls, received calls, and directory contacts.
Feature Keys
The most commonly used feature keys are:
- The Mute Key
- The Headset Key
- The Messages Key
- The Redial Key
- The Speakerphone Key
- The Volume Control
Menu
The Yealink T33G phone offers a Menu to enable users to view their phone’s status and access its features, directory, calling history, voice message center, and basic and advanced settings.
Use the navigation arrows to select from the menu options.
Using Your Device
Place Calls and Receive Calls
To place a call:
- Pick up the handset.
- Dial the 10-digit phone number, and your call is placed automatically after 4 seconds.
- You can also dial a valid 10-digit number and press the Send soft key. Your call is placed via speakerphone.
To answer a call:
- Pick up the handset, or press the Answer soft key to activate the speakerphone.
To answer an incoming call when you’re already on an active call:
- Press the Answer soft key.
- The first call is automatically placed on hold.
- To retrieve the first call, press the Line key of the call to wish to continue or press the Swap soft key.
Hold
To put an active call on hold:
- Press the Hold soft key.
- To resume the call, press the Resume soft key.
If you have more than one call on hold, tap the call you wish to continue and press the Resume soft key.
Blind Transfer
A Blind (or unannounced) Transfer takes place when you transfer a call to someone else without announcing the call first.
To conduct a blind transfer while on an active call:
- Press the Transfer soft key.
- Enter the destination to which you wish to transfer the call
- Press the Blind Transfer soft key.
Please Note: When performing a Blind Transfer, the caller ID of the transfer recipient will show the information of the contact to who you are transferring.
Consulted Transfer
A Consulted (or announced) Transfer is performed when you announce the call to the recipient prior to transferring the call.
To conduct a Consulted Transfer while on an active call:
- Press the Transfer soft key.
- The caller is automatically placed on hold.
- Dial the receiving party and press the Call soft key.
- Once the receiving party answers, announce the call.
- To complete the transfer, press the Transfer soft key again.
Please Note: When performing a Consulted Transfer, the caller ID of the transfer recipient will show your contact information, as you will be announcing the call first. If you prefer to transfer the caller ID as well, you should perform a Blind Transfer.
Three-Way Conference
To initiate a Three-Way Conference Call while on an active call:
- Press the Conference soft key.
- Dial the second number.
- When the second party answers, press the Conference soft key again to connect the two calls.
- You can place both callers on hold at any time by pressing the Hold soft key, and if you’d like to split the calls to communicate with each individual line, select the Split soft key.
- To merge the calls into a conference call once again, press the Conference soft key.
Do Not Disturb
The Do Not Disturb feature is used to send all incoming calls to voicemail.
To enable Do Not Disturb:
- Press the DND soft key.
- The Do Not Disturb icon on the home screen indicates that the feature has been enabled.
Callers will hear the busy greeting and be sent to your voicemail.
Please Note: Once Do Not Disturb is enabled, calls cannot be received until you disable the feature. To disable this feature, repeat the previous steps.
Call Forward
By default, calls that are not answered will go to voicemail.
To forward calls to a destination other than voicemail, enable Call Forwarding or change your Voice Portal Busy and No Answer settings.
To enable this feature:
- Press the Menu soft key.
- Use the arrows to navigate to Features. Use the center button to select.
- Press Call Forward. Your options include:
- Always Forward – Forwards all incoming calls to a specified forward-to destination.
- Busy Forward – Only forwards calls if you do not answer.
- No Answer Forward – Forwards calls when the Do Not Disturb feature is enabled or if your line is busy.
- Select the Call Forwarding you wish to enable.
- Use the Navigation Arrows to switch the setting to On and enter the phone number to forward calls.
- Press the Save soft key when you are done. The Forwarding Indicator appears on the home screen.
Please Note: When configuring No Answer forwarding, you must also select the number of seconds before the call is forwarded.
To configure:
- Select Call Forward, and choose No Answer Forward.
- Enable the feature and enter the number to which to forward calls.
- Select the number of seconds it would take before the call is forwarded. You can choose from 0 – 120 seconds.
- Select the Save soft key.
Call Park
To park a call while on an active call:
- Tap the Transfer soft key.
- Dial star (*) 103 and press pound (#).
- You are prompted with a parking spot number.
- To complete the parking process, tap the Transfer soft key again.
Retrieve Parked Calls
Parked calls can be retrieved from any phone within the office.
To retrieve a parked call:
- Dial star (*) 104 and press pound (#).
- When prompted, dial the parking spot or number you were provided.
- Your call is retrieved.
Add Contacts
To add a new contact:
- Press the Directory soft key.
- Select the directory group you wish to add a contact to.
- Press the Enter soft key and select Add.
- Enter the information fields and press the Save soft key.
To create a new contact from the Call History list:
- Press the Redial key to access your Call History.
- Find the number you wish to store, then press the Option soft key.
- Select Add to Contacts.
- Enter the information fields and press the Save soft key when you are done.
Your new contact appears in the contact list of your directory.
Access Call History
You can view your recent Call History and place calls from your Call History lists by pressing the History soft key on the home screen. You can also access the call history list by pressing the up navigation arrow to view call lists for all, missed, placed, received, and forwarded calls.
To see recently placed and received calls:
- Tap the Redial key.
- To dial a number, use the Navigation Arrows to navigate to the call you would like to place.
- Press the Call soft key or middle navigation button.
Set Up Voicemail
To set up your Voicemail for the first time:
- Press the Message feature key.
- Enter your default passcode, followed by the Pound key.
- Follow the system prompts to complete voicemail setup.
Access Voicemail
A Message Waiting Indicator notifies you when you have a new voicemail message.
To check your voicemail:
- Press the Message key.
- When prompted, enter your voicemail passcode followed by the Pound key.
- Follow the audio prompts to retrieve your voicemail messages.
- If you forget your voicemail passcode, please contact your system administrator to have it reset.
Update Voicemail
You can update your voicemail from the Vonage Portal and your Vonage desk phone.
- Using your Vonage Yealink desk phone, select the Message key.
- Enter your voicemail passcode and then select from the menu options provided:
- Access Voicemail
- Select or Change Greeting
- Record New Greeting
- Update PIN