• Live Chat
  • Report an IT Security Incident
  • Request Help
  • Help & Support
    • Live Chat
    • Request Help
    • Track a Ticket
    • Knowledge Base
    • Getting Started
    • Working/Learning Remotely
    • Computer Labs & Classrooms Information
  • Service Catalog
    • ITS General Help
    • Accounts & Access
    • Communications & Collaboration
    • Computers & Software
    • Information Security
    • Network & Internet Services
    • Professional Services
    • Research Computing
    • Teaching & Learning
    • University Applications
  • About ITS
    • Our ITS Team
    • Strategic Plan
    • Annual Reports
    • Awards
    • Student Employment
  • Working with ITS
    • Architectural Standards Review Board
    • Banner Admin
    • Business Intelligence
    • Data Governance
    • Enterprise Data Integration Services (EDIS)
    • IT Business Analysis
    • IT Security Office
    • Projects & Project Management
    • Technical Business Solution Intake Request Process
  • Alerts & Outages
    • Unplanned Outages
    • Phishing Alerts
    • Maintenance
    • After Action Reports
    • Archives
    • ITS Alerts Sign Up
  • News
    • Bits & Bytes Signup
    • Bits & Bytes Submissions
    • Bits & Bytes Archive
    • Spotlights
    • Bulletins
George Mason University
  • Live Chat
  • Report an IT Security Incident
  • Request Help
X Hide

Information Technology Services

Skip to content
  • Help & Support
    • Live Chat
    • Request Help
    • Track a Ticket
    • Knowledge Base
    • Getting Started
    • Working/Learning Remotely
    • Computer Labs & Classrooms Information
  • Service Catalog
    • ITS General Help
    • Accounts & Access
    • Communications & Collaboration
    • Computers & Software
    • Information Security
    • Network & Internet Services
    • Professional Services
    • Research Computing
    • Teaching & Learning
    • University Applications
  • About ITS
    • Our ITS Team
    • Strategic Plan
    • Annual Reports
    • Awards
    • Student Employment
  • Working with ITS
    • Architectural Standards Review Board
    • Banner Admin
    • Business Intelligence
    • Data Governance
    • Enterprise Data Integration Services (EDIS)
    • IT Business Analysis
    • IT Security Office
    • Projects & Project Management
    • Technical Business Solution Intake Request Process
  • Alerts & Outages
    • Unplanned Outages
    • Phishing Alerts
    • Maintenance
    • After Action Reports
    • Archives
    • ITS Alerts Sign Up
  • News
    • Bits & Bytes Signup
    • Bits & Bytes Submissions
    • Bits & Bytes Archive
    • Spotlights
    • Bulletins

How can ITS help you?

Our services are designed to help you succeed at Mason—
search our services, knowledge articles, how to guides, FAQs, and more.

Knowledge Base

Home > Help & Support > Knowledge Base > Teaching & Learning > Kaltura > Kaltura Information > Kaltura Capture Desktop Recording Tool

Kaltura Capture Desktop Recording Tool

Kaltura Capture offers users the ability to record both the active computer screen and live camera at the same time. It also includes a new automatic slide detection feature—if a user has a PowerPoint presentation in presenter mode when recording the screen, Kaltura Capture automatically detects and captures it, allowing the viewer to search and browse by slide. System Requirements.

Kaltura Capture How-to Video

  1. Log in to Blackboard, Canvas, or CourseMedia. Access the Kaltura MyMedia link.
  2. Select Add New then select Kaltura Capture from the drop-down menu.
  3. Download either Mac or Win versions and follow the install prompts.
  4. After installing, follow Step 2 (above) again. This links your Blackboard account with Kaltura. After this, you can now open Kaltura Capture directly from your computer going forward.

Launch the Application
The first time you open Kaltura Capture, you must open it from within Canvas or CourseMedia > My Media > Add New. This links your account to the Capture program. After this initial application launch, you can open the program directly from your computer. The Kaltura Capture Recorder is displayed.

Mac Users: You may need to give permission to record your screen. Go to your Mac System Preferences>Security/Privacy>Privacy. On the left side go to these three areas - Cam/Mic/Screen Record - and give permission to Kaltura Capture.


Recording Options
Choose what you want to record. There are three options - choose any or all of them. Record screen (for PowerPoint or anything on your computer), video (webcam), and audio. If the icon is blue this will be part of the recording. Click the icon to deselect it.

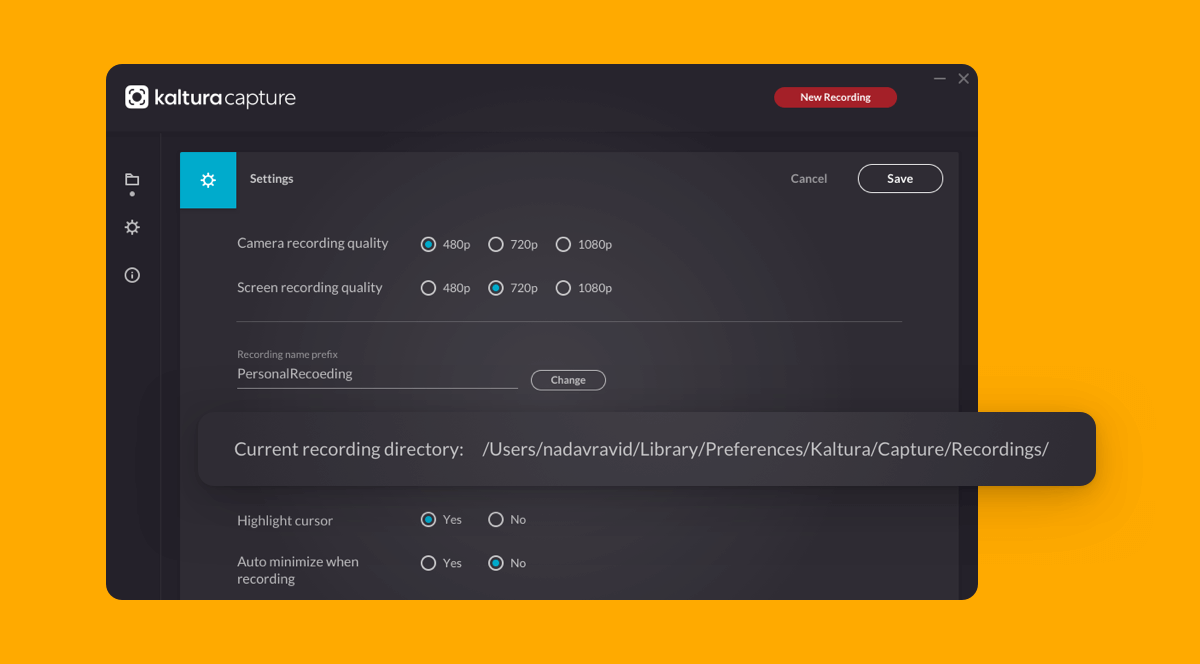
By default, all recording inputs are configured to the optimal quality available, so you can start recording. If you would like to change the default input settings, camera, screen or audio, please see the article Kaltura Personal Capture Recording Options for information on how to modify the default recording inputs.

Create a Recording

  1. Choose what you want to record (screen, webcam, audio).
  2. Select the red button to start recording.
  3. You will see a 3-second count down, and then your recording will start.
  4. When the recording begins, the duration of your recording is displayed in the Recording Menu.


The Recording Menu
The recording menu includes:

  • Stop recording button (white square): Press to stop the recording. You will be prompted with a confirmation box.
  • Pause/Resume recording button (red circle): You can pause or resume your recording at any time.
  • Cancel recording button (gray x): discard recording. Press to cancel the recording. You will be prompted with a confirmation box.
  • Elapsed time
  • Annotations: Click on the Pencil icon to open the Annotations options. Use the various tools to draw on the screen. There is a whiteboard option. When you are through annotating, click the Pencil icon to return to the cursor mode. Annotations are available for Screen recordings only. Annotations are disabled if you are only recording your camera.
  • Audio Gauge: Displays the sound level of the microphone being recorded.

Keyboard Shortcuts
The following list the shortcuts that you can use with Capture. Use Command(⌘) for Mac and Control(CTRL) for Windows.

  • Start Recording: Command(⌘)/Control(CTRL)+Shift+R
  • Stop Recording : Command(⌘)/Control(CTRL)l+Shift+S
  • Cancel Recording: Command(⌘)/Control(CTRL)+Shift+C
  • Clear all Notifications: Command(⌘)/Control(CTRL)+Shift+E
  • Go to Management: Command(⌘)/Control(CTRL)+Shift+M

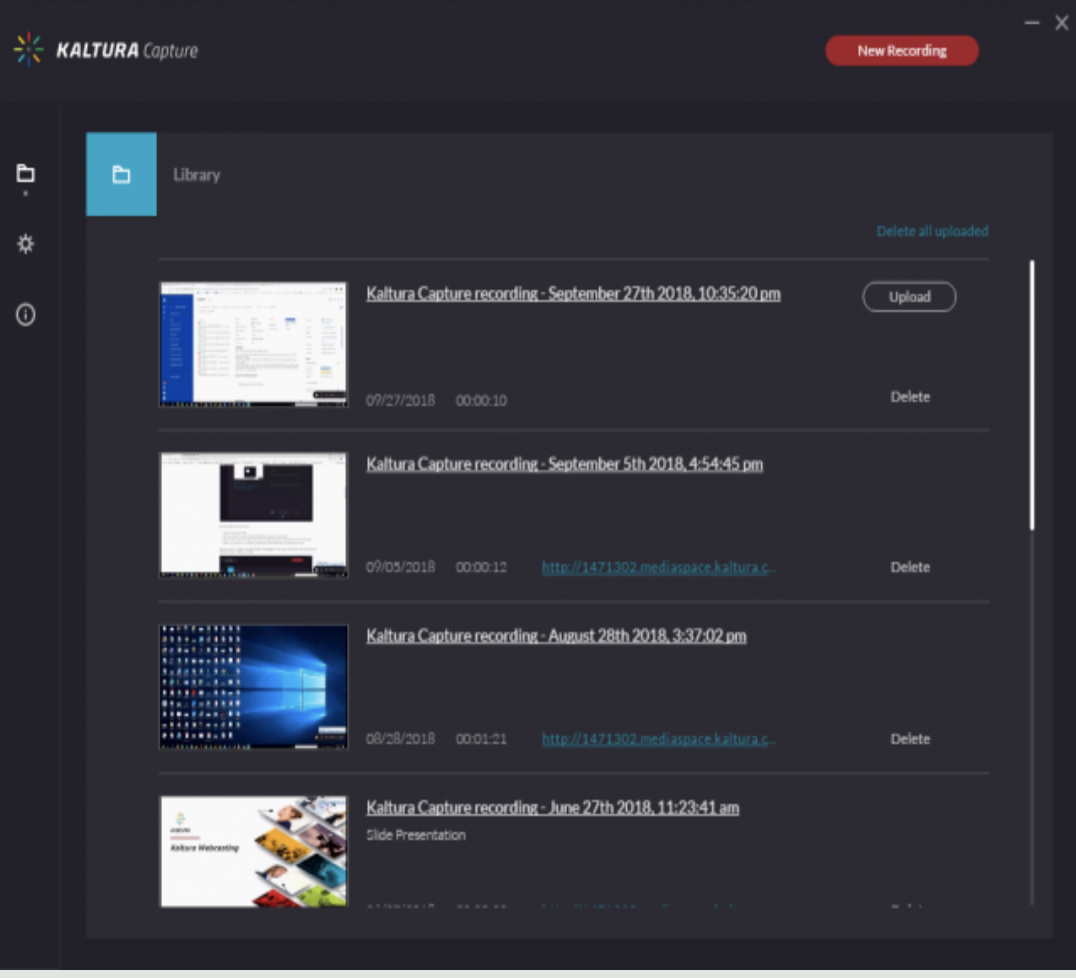
Completing and Uploading Your Recording
After you Stop your recording, you will be directed to the summary page. If you selected Stop by mistake, you can always select Cancel, and you will be returned to your recording in a paused state. Preview your recording here. If you want to complete the recording, optionally edit the Title and add a Description or Tags then select Save. If you are ready to upload to your My Media space in Blackboard (and Course Media) click Save & Upload.

Note: Editing your recording (trimming beginning and end, and clipping) is only available in your My Media space online once the recording has been uploaded. It cannot be edited via Kaltura Capture before uploading.

If you save a recording without uploading it, the Management window shows all recordings completed on your computer. You can choose to Delete or Upload recordings from this screen. You can also Re-upload recordings from this screen.


Find Recordings on Your Computer

While it is unlikely you will need to access the recording files, all recordings are stored locally on your computer.

Windows

  1. Right click on the Kaltura Capture icon on the desktop.
  2. Select Properties.
  3. Click on 'Open File Location' and go up one folder to the 'Capture' folder.

Or simply go to: C:\Users\<username>\AppData\Local\Kaltura\Capture\

If browsing to the Capture folder, note that the AppData folder is hidden. To unhide: Open File Explorer > Go to View tab > Options > View tab > Under "Hidden files and folders", select "Show hidden files, folders and drives"

Mac

  1. Go to the Finder.
  2. From the Go menu, select Go to Folder.
  3. In the form, enter ~/Library/Preferences/Kaltura/Capture/
  4. Click Go.

Or simply go to: /Users/<username>/Library/Preferences/Kaltura/Capture/

The location of the files also appears in the program's settings page.
Capture Settings

Viewing and Editing your Recording Online
All uploaded recordings are now available in your MyMedia account. MyMedia is available in Blackboard (mymason.gmu.edu), as well as on CourseMedia (coursemedia.gmu.edu). You can edit your recording in MyMedia.

Last modified: July 23, 2025

Previous

How to Make a Public Link to a Kaltura Video

Next

How to Submit Video to a Course

Related Downloads

  • Kaltura Capture for Windows
  • Kaltura Capture for Mac

Related Articles

  • Can someone else upload media for me using Kaltura?
  • How do I launch and use the Kaltura Video Editing Tools?
  • How to Install Kaltura Capture desktop recorder application?
  • How to Create Interactive Video Quizzes in Kaltura

Get Started at Mason

Whether you are a student, faculty, staff member, or a guest visiting the Mason campus, we have resources to help get you started.

READ MORE

Quick Links

Patriot Pass Password Reset
Create a Ticket
Track a Ticket
PuTTY
Cisco AnyConnect VPN

READ MORE

Explore IT Services

A B C D E F G
H I J K L M N
O P Q R S T U
V W X Y Z #

I T S Logo

© 2024 George Mason University
4400 University Drive
Fairfax, Virginia 22030

Follow Us
location pin for in-person IT support   @GeorgeMasonITS
location pin for in-person IT support   @georgemasonits
ITS Support 24/7
   703-993-8870
   Live Chat
  • Webmaster