Prerequisites
Server Upload Permissions
The default setting for newly uploaded files is that they are only readable by the user who uploaded them. This results in a Forbidden error when the files are viewed through a web browser. In order to access them, you have to make them world-readable. Instructions to adjust server upload permissions are available in the How to Fix Server Upload Permissions article.
How to Set Up a Site in Dreamweaver
Step 1
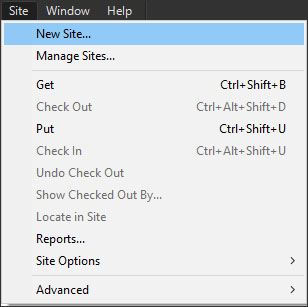
Open up Dreamweaver and go to Site > New Site…
Step 2
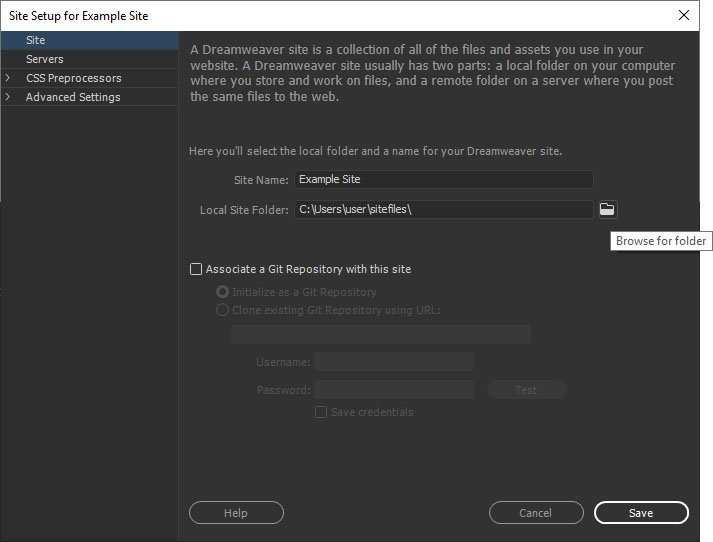
In the Site Setup window:
- On the left-hand side select Site
- Enter a Site Name (Note: this can be anything).
- Click the folder icon on the right of Local Site Folder.
- Select the folder on your hard drive that corresponds to your web site files.
Step 3
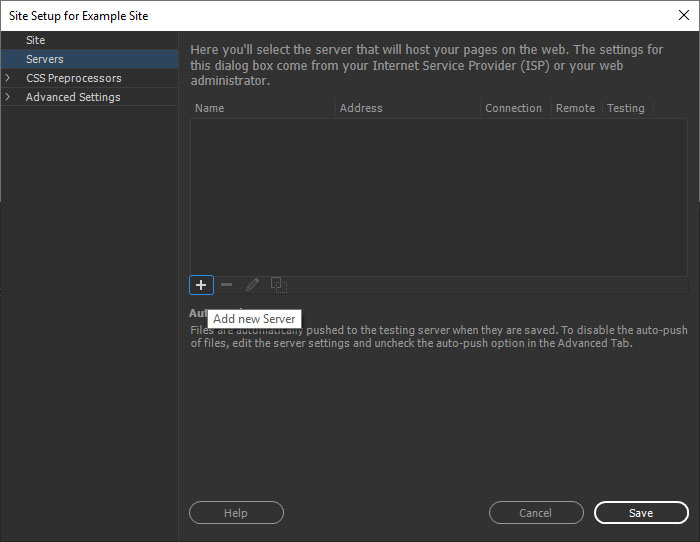
In the Site Setup window:
- On the left-hand side, select Servers
- Click the plus (
 ) on the bottom left of the server panel
Step 4
In the Basic tab (blue below), you will enter your website’s information.
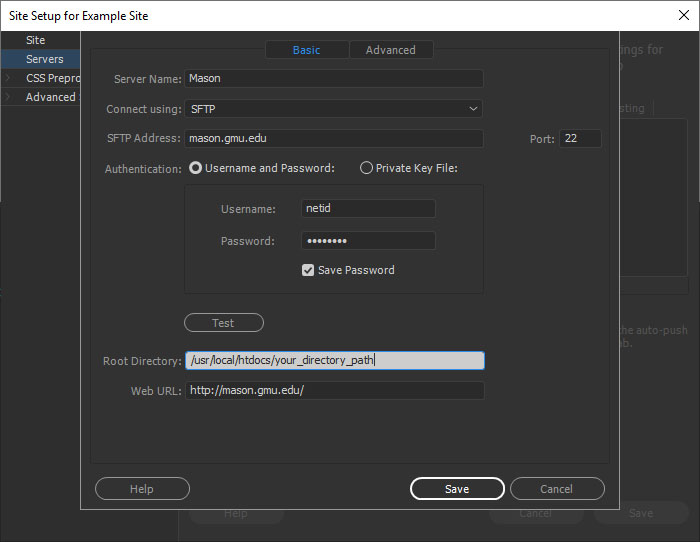
Enter the following information:
-
- Server Name: Mason
- Connect using: choose SFTP from the dropdown list
- SFTP Address: mason.gmu.edu
- Username: NetIDNote: use your NetID here, not including @gmu.edu
- Password: enter your Patriot Pass Password.
Note: if you are using a private computer, you may check safe but is NOT recommended for public computers. - Root Directory:
/usr/local/htdocs/your_directory_path- Replace
your_directory_pathappropriately. For instance, if your site is located atwww.gmu.edu/departments/english,your_directory_pathwould bedepartments/english) - These root directory instructions do NOT apply to personal sites
http://mason.gmu.edu/~userid(where userid is your NetID). These connections automatically default to your home directory so you may leave the directory path blank. Be sure to upload your files into a public_html folder and not directly into your home directory or else they will not appear online.
- Replace
Step 5
Click Save.
Step 6
This will bring you back to the site setup for your site, click Save again.
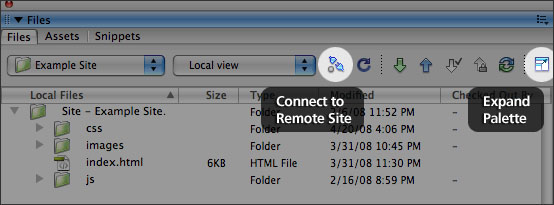
You should now have a Files palette that shows your local web site files. If you ever open Dreamweaver and the Files palette isn’t there, it can be accessed by going to Window > Files.
How to Upload Files
Step 1
In the Files palette, click the Expand Palette icon highlighted in the screenshot to the right to expand the palette so that the files on the server are displayed on the left, and your local files are on the right.
Step 2
Click the Connect to Remote Server icon highlighted in the screenshot to the right to connect. If it is successful, you will see a file listing on the left.
Step 3
To upload files, simply select the files you want to upload on the right, and press the blue up button on the toolbar, or right-click your selection, and choose Put.
