• Live Chat
  • Report an IT Security Incident
  • Request Help
  • Help & Support
    • Live Chat
    • Request Help
    • Track a Ticket
    • Knowledge Base
    • Getting Started
    • Working/Learning Remotely
    • Computer Labs & Classrooms Information
  • Service Catalog
    • ITS General Help
    • Accounts & Access
    • Communications & Collaboration
    • Computers & Software
    • Information Security
    • Network & Internet Services
    • Professional Services
    • Research Computing
    • Teaching & Learning
    • University Applications
  • About ITS
    • Our ITS Team
    • Strategic Plan
    • Annual Reports
    • Awards
    • Student Employment
  • Working with ITS
    • Architectural Standards Review Board
    • Banner Admin
    • Business Intelligence
    • Data Governance
    • Enterprise Data Integration Services (EDIS)
    • GMU-TV
    • IT Business Analysis
    • IT Security Office
    • Projects & Project Management
    • Technical Business Solution Intake Request Process
  • Alerts & Outages
    • Unplanned Outages
    • Phishing Alerts
    • Maintenance
    • After Action Reports
    • Archives
    • ITS Alerts Sign Up
  • News
    • Bits & Bytes Signup
    • Bits & Bytes Submissions
    • Spotlights
    • Bulletins
George Mason University
  • Live Chat
  • Report an IT Security Incident
  • Request Help
X Hide

Information Technology Services

Skip to content
  • Help & Support
    • Live Chat
    • Request Help
    • Track a Ticket
    • Knowledge Base
    • Getting Started
    • Working/Learning Remotely
    • Computer Labs & Classrooms Information
  • Service Catalog
    • ITS General Help
    • Accounts & Access
    • Communications & Collaboration
    • Computers & Software
    • Information Security
    • Network & Internet Services
    • Professional Services
    • Research Computing
    • Teaching & Learning
    • University Applications
  • About ITS
    • Our ITS Team
    • Strategic Plan
    • Annual Reports
    • Awards
    • Student Employment
  • Working with ITS
    • Architectural Standards Review Board
    • Banner Admin
    • Business Intelligence
    • Data Governance
    • Enterprise Data Integration Services (EDIS)
    • GMU-TV
    • IT Business Analysis
    • IT Security Office
    • Projects & Project Management
    • Technical Business Solution Intake Request Process
  • Alerts & Outages
    • Unplanned Outages
    • Phishing Alerts
    • Maintenance
    • After Action Reports
    • Archives
    • ITS Alerts Sign Up
  • News
    • Bits & Bytes Signup
    • Bits & Bytes Submissions
    • Spotlights
    • Bulletins

How can ITS help you?

Our services are designed to help you succeed at Mason—
search our services, knowledge articles, how to guides, FAQs, and more.

Knowledge Base

Home > Help & Support > Knowledge Base > University Applications > MicroStrategy > MicroStrategy Reports - Customize > How to Unmerge Row Headers in a MicroStrategy Report

How to Unmerge Row Headers in a MicroStrategy Report

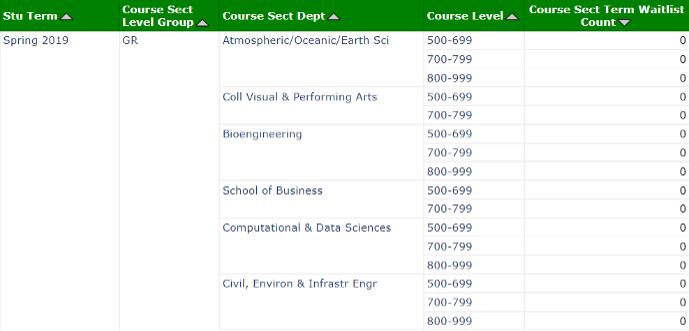
In a Grid report or a Grid visualization for a Dossier, you can choose to display data with row headers either merged or unmerged (see below).

Merged Row Headers

Unmerged Row Headers

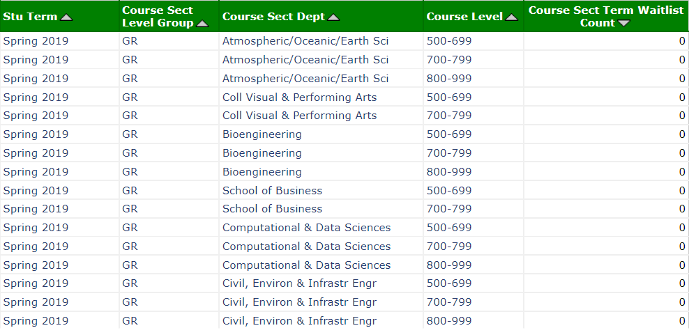
MicroStrategy reports typically merge row headers as it groups the same value in the row headers and gives the report a cleaner look. Users can unmerge row headers when needed, especially before exporting the data for further data manipulation in Excel.

To Unmerge Row Headers in a Grid Report

Step 1

In the Report Menu Bar on top of the report, click GRID tab. This will bring out a set of grid-related features in the Toolbar below.

Step 2

Locate the icon , which will display a pop-up window that says Merge Row Headers when hover your cursor over it. The blue color indicates that it is currently in use. Click on it to turn this feature off and the color will change to white (not in use).

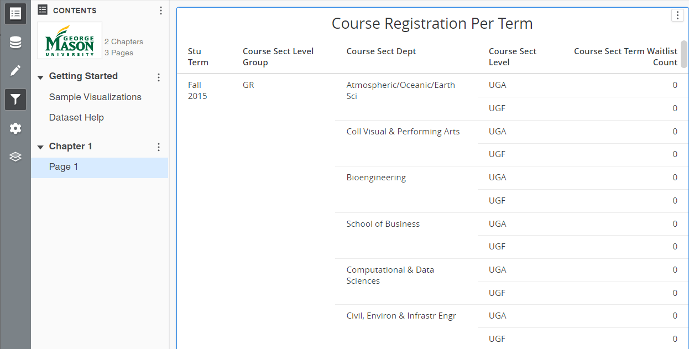
To Unmerge Row Headers in a Dossier

Step 1

Open the dossier and locate the page, click on the grid visualization. A blue border line will appear indicating the visualization is being selected. This is important when a page contains multiple visualizations.

Step 2

From the View panel located on the very left of the page, click the icon that opens the Format panel, which typically overlaps with the Filter panel.
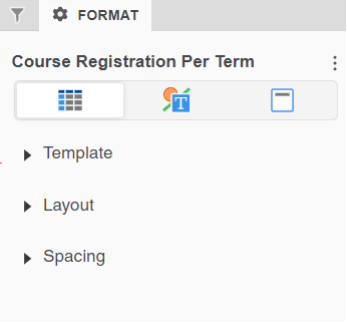
Step 3

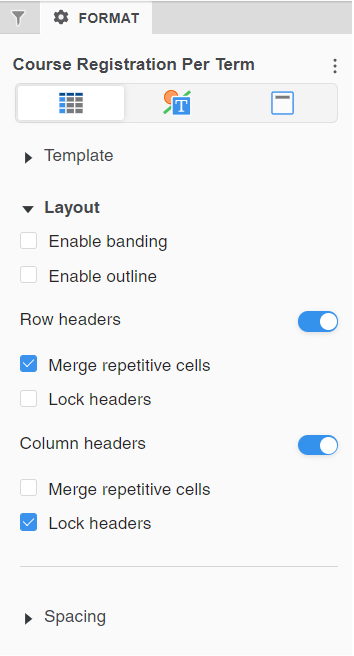
By default, the Format panel opens in the Visualization Options tab which is the first of all the tabs from the left. Under this tab, click on the triangle icon to expand Layout.

Step 4

Under Row headers, uncheck Merge repetitive cells. Click the triangle icon to collapse Layout.

Step 5

From the View panel located on the very left of the page, click the icon  again to close the Format panel. The icon will no longer be in shade (not in use).

Last modified: September 9, 2024

Previous

How to Change the Order of Displayed Attribute Forms on a MicroStrategy Report

Next

How to Display Different Attribute Forms on a MicroStrategy Report

Related articles

  • How to Set Up an Email Subscription to a MicroStrategy Report
  • How to Change the Default Saved Prompt Answer in MicroStrategy
  • How to Change the Order of Displayed Attribute Forms on a MicroStrategy Report
  • How to Display or Hide Attribute Form Names on a MicroStrategy Report
  • Troubleshooting MicroStrategy Login Issues: Initial Steps

Get Started at Mason

Whether you are a student, faculty, staff member, or a guest visiting the Mason campus, we have resources to help get you started.

READ MORE

Quick Links

Patriot Pass Password Reset
Create a Ticket
Track a Ticket
PuTTY
Cisco AnyConnect VPN

READ MORE

Explore IT Services

A B C D E F G
H I J K L M N
O P Q R S T U
V W X Y Z #

I T S Logo

© 2024 George Mason University
4400 University Drive
Fairfax, Virginia 22030

Follow Us
location pin for in-person IT support   @GeorgeMasonITS
location pin for in-person IT support   @georgemasonits
ITS Support 24/7
   703-993-8870
   Live Chat
  • Webmaster
X

ITS Technical Support Now Available 24/7

Students, faculty, and staff can receive technical support any time—day or night, on weekends, and even on holidays. If you need IT help, call 703-993-8870 anytime or create a ticket.