Media Sanitization Procedure
Responsible Offices
IT Security Office (ITSO)
Related Documents
- University Policy Number 1114A, Removal of University Data from Electronic Media
- ITS.ITSO-PRS006, Media Sanitization Process
Reference Documents
None
Document Control Number
ITS.ITSO-PROC006
Last Reviewed Date
6/18/2024
Applies To
This document applies to all university departments and offices at all George Mason University locations that intend to release Mason-owned electronic devices for reuse and surplus disposal.
Purpose & Scope
This procedure provides instructions for permanently removing data from Mason-owned electronic devices, verifying their sanitization, and documenting the process.
The scope of this procedure:
- This procedure should be executed before the release for reuse of Mason-owned electronic devices.
- This procedure should be executed before the surplus disposal of Mason-owned electronic devices.
Definitions
Electronic Device: Any electronic equipment that has a storage device or persistent memory, including but not limited to computers, servers, personal data assistants, cell phones, smartphones, routers, switches, firewall hardware, and certain models of printers and copiers.
Information system media: These are components in an electronic device that store data or use persistent memory. Information system media includes both digital and non-digital forms. Digital media include magnetic disks, flash-memory or Solid-State Devices (SSDs), and optical media. Non-digital media include paper and microfilm.
Media Sanitization: [NIST Definition] The actions taken to render data written on media unrecoverable by both ordinary and extraordinary means.
Release for Reuse: This is the practice of releasing electronic devices for continued use. Examples of Release for Reuse include interdepartmental transfers, returns for replacement, returns for repair, donations to eligible organizations, and loans to faculty and staff for use at alternate locations.
RUFUS: This is a free tool that will correctly prepare the USB drive, automatically extract the contents of the ISO file you have, and properly copy the files contained within it to your USB device. It is a portable program (does not install) and works on Windows.
To download this free tool, go to RUFUS.
ShredOS: ShredOS is a specialized Linux distribution leveraging the “nwipe” fork of DBAN (Darik’s Boot and Nuke). It is designed to securely erase a hard disk until its data is permanently removed and no longer recoverable, which is achieved by overwriting the data with pseudorandom numbers generated by Mersenne Twister or ISAAC. ShredOS erases all the files on the hard drive including installed applications, files, and the operating system.
To download a free version, go to: https://github.com/PartialVolume/shredos.x86_64
Surplus Disposal: This is the practice of disposing of electronic devices that have been declared excess or surplus to the needs of the university’s administrative units or departments.
Instructions
Step 1 — Determine Which Data Sanitization Technique to Use
Use the chart below to determine which data sanitization technique to use on a Mason-owned electronic device.
Note: Optical media such as CD, CD-RW, DVD, and DVD RW can NOT be released for reuse. They must be physically destroyed through a shredder.

Select/Click to see a detailed description of the Data Sanitization Technique Determination Flowchart
Start
Is this for a HDD > Yes > ShredOS > End
Is this for a SSD running on macOS or Windows > Yes > Erase > End
Is this for a SSD running on UNIX > Yes > hdparm > End
Is this for a flash memory drive > Yes > Secure Erase > End
Is this for a multi-function printer or mobile device > Yes > Factory reset > End
Is this for a non-volatile memory device > Yes > delete configuration > End
Is this for a defective/nonfunctional media > Yes > Physically destruction > End
Step 2 — Implement the Data Sanitization Technique
A. Using ShredOS on Hard Disk Drives
ShredOS is a free alternative to the previously recommended DBAN tool. It is a self-contained Linux distribution using the nwipe program (a fork of the original DBAN project) and is licensed under the GNU General Public License v.2.
- Create a Bootable ShredOS Disk
- Download ShredOS images from the following location: https://github.com/PartialVolume/shredos.x86_64.
- Create a bootable ShredOS media CD by simply inserting a blank CD, right-clicking the iso file from the “Downloads” folder, and click “Burn CD Image”, and then go to Step 3, Fill out the Certificates of Data Destruction Sticker. Otherwise, go to Step 2b to create a bootable ShredOS disk using a USB device.
- Creating a Bootable ShredOS on USB (optional)Up-to-date directions are posted on the ShredOS GitHub here: https://github.com/PartialVolume/shredos.x86_64#obtaining-and-writing-shredos-to-a-usb-flash-drive-the-easy-way
- Download Rufus, a free tool that will correctly prepare the USB drive, automatically extract the contents of the ISO file you have, and properly copy the files contained within it to your USB device, including any files in the ISO needed to make it bootable.
- Rufus is a portable program (does not install) and works on Windows 10, 8, 7, Vista, and XP. Select the latest Rufus Portable download from the download screen.

- Double-click on the rufus-<version number>.exe file that you just downloaded. The Rufus program will start right away.
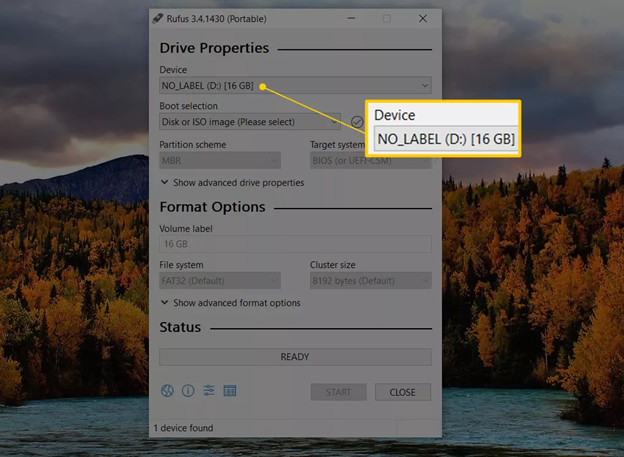
- Insert the flash drive or other USB device into your computer that you want to “burn” the ISO file to, assuming it’s not already plugged in.
Note: Burning an ISO image to a USB drive will erase everything on the drive! - From the Device drop-down at the top of the Rufus program screen, choose the USB storage device you want to burn the ISO file to.
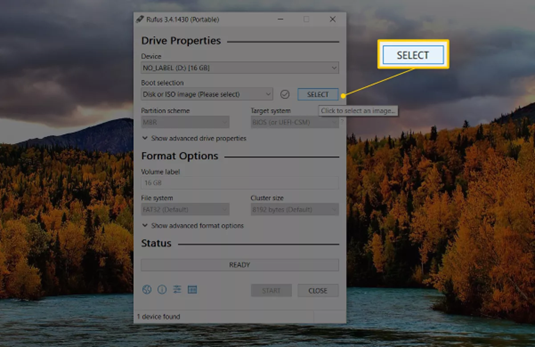
- From the Boot selection drop-down, make sure Disk or ISO image (Please select) is chosen. Click the SELECT button.
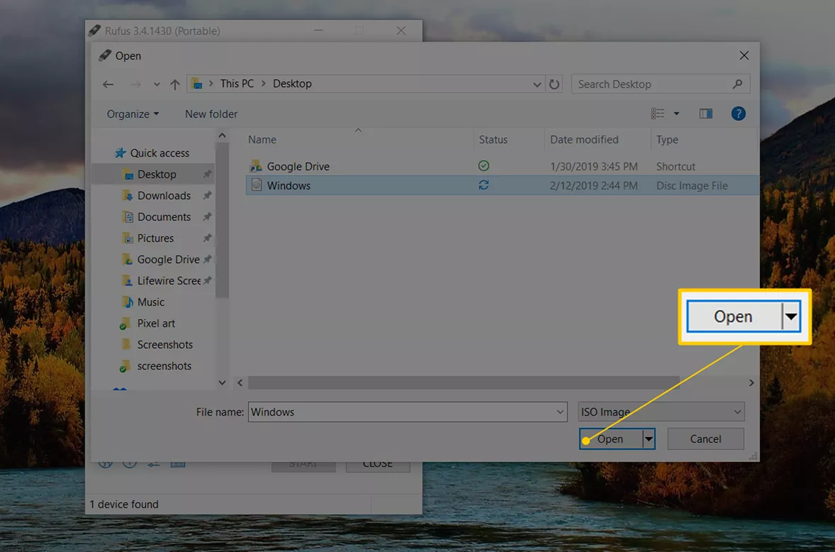
- When the Open window appears, locate and then select the IMG file downloaded from the ShredOS GitHub site. Once selected, click the Open button.
- Wait while Rufus inspects the IMG file you chose. This might take several seconds or may go by so quickly.
Note: If you get an Unsupported ISO message, the ISO you chose is not supported for burning to USB by Rufus. In this case, try one of the other programs, such as UNetbootin, ISO to USB, and Universal USB Installer. - Under the Image option area, pick Standard Windows installation (if you see this).
- Leave the Partition scheme, Target system, File system, and Cluster size options alone.
- Accept the default on the Volume label field.
- Click on the START button to start the “burning” of the IMG file to the USB device you chose.
Note: If you get a message, you’ll need to use a larger USB device.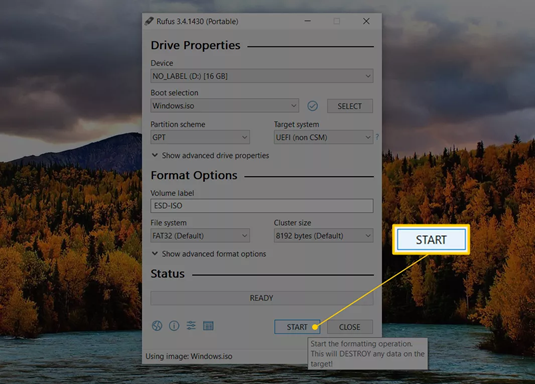
- Click on the OK button to the WARNING: ALL DATA ON DEVICE ‘XYZ’ WILL BE DESTROYED message that appears next.
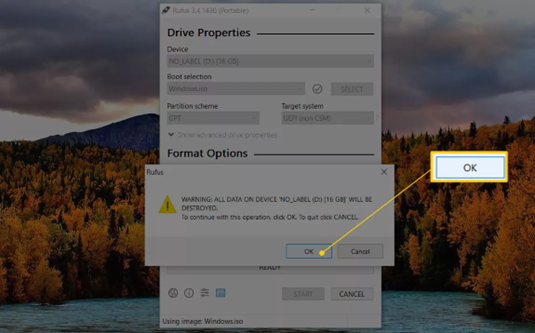
- Wait while Rufus properly formats the USB drive so it’s bootable, and then copies all of the files to the drive that are contained in the ISO file.
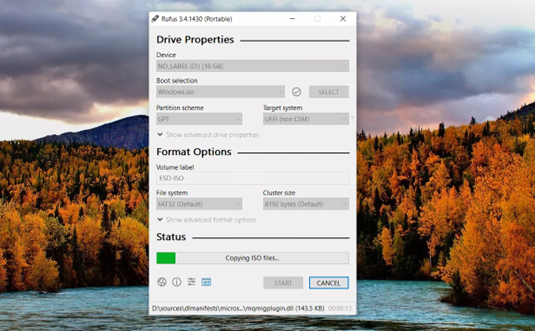
- Once the status at the bottom of the Rufus program window says READY, you can close Rufus and remove the USB drive.
- Sanitize the Hard Disk Drive using ShredOS
- Insert the CD or USB into the computer.
- Restart your computer. You should see the ShredOS Main Menu below.

- The arrow indicates the current disk and partition selection. Hit the SPACEBAR to select the drive/partition – the word “wipe” will appear in the square brackets. Repeat for all disks/partitions you wish to include in the operation.
Note: for RAID controllers, you may need to disassemble the RAID array in order to show the individual disk members. It will be much faster to wipe the separate disks instead of the virtual disk(s) the controller presents to the OS. - Methods can be changed with the “m” key. DOD Short is recommended for sensitive data sets and disks that will be sent to surplus. Fill with ones can be used for disks that will be reused.
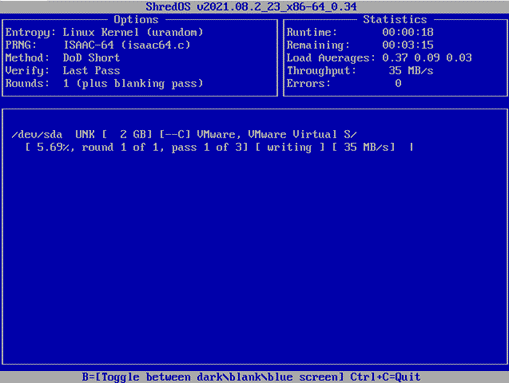
- Press Shift+S to start the process. Once ShredOS starts running, you should see this screen below. You can neither stop nor pause the process.
- Once ShredOS is done, you should see this screen below.
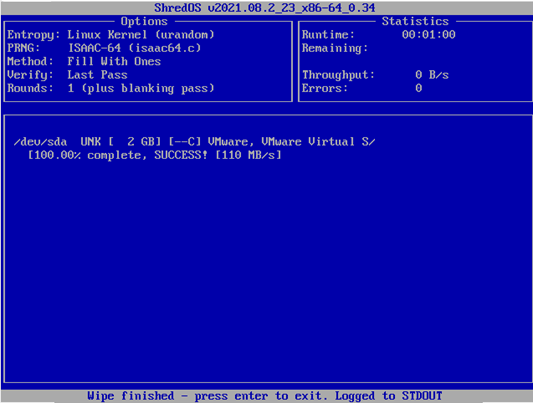
- At this point, you can safely remove the CD or USB device that you’ve installed ShredOS to, and then shut down your computer.
B. Using Erase on Solid State Drive Running on Mac OS
- Reboot the computer.
- After hearing the boot sound, simultaneously press COMMAND + OPTION + R until the spinning globe appears and “Internet Recovery” is displayed.
- In the menu that is presented, select “Disk Utility” and press “Continue”.
- Highlight the internal disk entry and click the “Erase” button.
- The erase function will take several seconds.
C. Using Secure Erase on Solid State Drive Running on Windows
Some Dell workstations after 2015 with a compatible drive will have a “Data Wipe” option in the BIOS Setup.
- Boot to the system BIOS by pressing the F2 at the Dell Splash screen during system startup.
- Once in the BIOS, select the Maintenance option, then Data Wipe option in the left pane of the BIOS using the mouse or the arrow keys on the keyboard
- Ensure “Wipe on Next Boot” is checked, and confirm you would like to continue the operation by clicking “OK”
- When asked if you want to cancel this operation, click “NO”
- The machine will reboot and issue the secure erase command.
For non-Dell systems, refer to the computer manufacturer’s site, OR use the hard disk manufacturer’s recommended utilities. Some manufacturers may not have a specific tool, but may mention any tool advertising ATA Secure Erase as a valid method.
Samsung Magician
https://www.samsung.com/semiconductor/minisite/ssd/product/consumer/magician
Kingston SSD Manager
https://www.kingston.com/us/support/technical/ssdmanager
Western Digital SSD Dashboard
https://support-en.wd.com/app/products/downloads/softwaredownloads
Crucial Storage Executive
https://www.crucial.com/usa/en/support-storage-executive
SanDisk SSD Dashboard
https://kb.sandisk.com/app/answers/detail/a_id/15108/~/sandisk-ssd-dashboard-support-information
Seagate SeaTools
https://www.seagate.com/support/downloads/seatools
PNY
PNY states that they support any other tool that advertises secure erase
ADATA SSD ToolBox
https://www.adata.com/en/support/downloads/
D. Using hdparm on Solid State Drive Running on UNIX
- Verify that the hard disk is not frozen.
# hdparm -I /dev/X
Security:
Master password revision code = 65534
supported
not enabled
not locked
not frozen
not expired: security count
supported: enhanced erase
2min for SECURITY ERASE UNIT. 2min for ENHANCED SECURITY ERASE UNIT. - Set a password on the drive.
# hdparm --user-master u --security-set-pass mypassword /dev/X - Verify the password set.
# hdparm -I /dev/X
Security:
Master password revision code = 65534
supported
enabled
not locked
not frozen - Issue the command to erase the drive
# hdparm --user-master u --security-erase mypassword /dev/X
security_password=”mypassword”/dev/X:
Issuing SECURITY_ERASE command, password=” mypassword “, user=user
E. Secure Erase on Flash-memory Device(s)
Any software capable of executing 3 pass, DoD-standard wiping is acceptable. One capable of erasing individual files or entire drives is Eraser (https://eraser.heidi.ie/).
F. Using a Factory Reset on Multi-function Printer(s)
Follow the device manufacturer’s recommendations. If internal storage involves a removable flash memory or hard disk, remove it from the device and follow the aforementioned procedures.
G. Using Factory Reset on Mobile Device(s)
- Apple iPhone
- Unpair your Apple watch (if applicable)
- Turn off “Find my iPhone.”
- Back up the device to iTunes (optional).
- Sign out of the Apple account associated with the device.
- Open Settings, then tap “General.” Next, select “Reset,” then “Erase All Content and Settings.”
- Power off the phone and remove the SIM card, if applicable.
- Android
- Navigate to Settings -> Security.
- If necessary, expand Advanced.
- Validate that “Encryption and Credentials” says “Encrypted.”
- If not, activate full disk encryption on the device
- Navigate to Settings, then System.
- If necessary, expand Advanced.
- Tap “reset options.”
- Tap “Erase all Data” (factory reset) and follow the confirmation prompts.
- Power down the phone and remove the SIM card, if applicable.
H. Deleting Configuration on Non-volatile Memory Devices (Routers, Switches, and Firewall Hardware)
Follow manufacturer recommendations for the specific hardware. If internal storage involves a removable flash memory or hard disk, remove it from the device and follow the aforementioned procedures.
I. Physical Destruction of Defective/Non-functioning media
Some media may be non-functioning, rendering the execution of a secure erase operation impossible. Typically, it is the controller on the device that has malfunctioned, leaving the data areas intact and recoverable with time and the right resources. For standard hard disk drives, ITS has an NSA-certified degaussing tool to apply strong magnetic fields to effectively erase hard disk platters. ITSO still recommends executing a software-based wipe on any standard hard disk drive before degaussing, if possible.
George Mason University has a contract with a third-party electronic recycler that can execute certified destruction of this media. Contact the IT Security Office to coordinate the delivery of media to be destroyed. The vendor can provide a certificate of destruction if requested for record-keeping purposes.
Step 3 — Fill out the Certificates of Data Destruction Sticker
- Download and print the Certificates of Data Destruction stickers on standard 2-inch high by 4-inch-wide shipping labels.
- Check the appropriate sanitization technique checkbox on one of the stickers.
- Fill in the Executed By and Date fields with your name and the date. Sign the sticker.
- To complete the verification process in Step 4, Verify a Successful Media Sanitization, find a departmental staff and give the staff the sticker.

Step 4 — Verify a Successful Media Sanitization
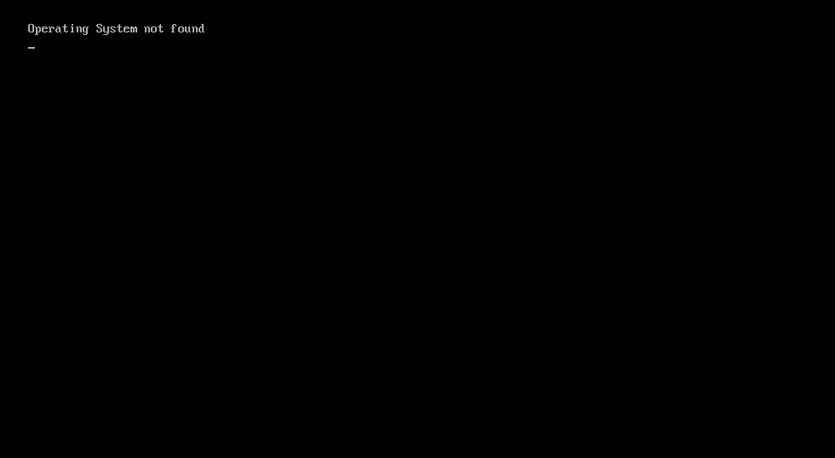
A. On Electronic Device with Hard Disk Drive
- To verify if the hard disk drive was wiped out successfully, turn on the computer, and you should see “Operating System not found” error on start-up.
- Print your name and enter the date on the Verifier’s Name (Print Name) & Date on the Certificates of Data Destruction sticker.
- Fill in the Verified By and Date fields with your name and date. Sign the sticker.
- Take the sticker and stick it on the side of the computer, preferably near the Asset Tag.
B. On Electronic Device with Solid State Drive Running on iOS
- After completion of the erasure process, the target drive should not have any recognizable partitions viewable by the Disk Utility.
- To complete the Certificates of Data Destruction sticker, perform Steps #2-4 of Step 4A, On Electronic Device with Hard Disk Drive.
C. On Electronic Device with Solid State Running on Windows
- The output screen of the drive wipe utility will show completion.
- To complete the Certificates of Data Destruction sticker, perform Steps #2-4 of Step 4A, On Electronic Device with Hard Disk Drive.
D. On Electronic Device with Solid State Drive Running on UNIX
- To verify, run hdparm and validate that the password on the drive is not enabled
# hdparm -I /dev/X
Security:
Master password revision code = 65534
supported
not enabled
not locked
not frozen
not expired: security count
supported: enhanced erase
2min for SECURITY ERASE UNIT. 2min for ENHANCED SECURITY ERASE UNIT. - To complete the Certificates of Data Destruction sticker, perform Steps #2-4 of Step 4A, On Electronic Device with Hard Disk Drive.
E. On Flash-memory Device(s)
- To verify, view the confirmation page from the tool of choice.
- To complete the Certificates of Data Destruction sticker, perform Steps #2-4 of Step 4A, On Electronic Device with Hard Disk Drive.
F. On Multi-function Printer(s)
- To verify, follow the manufacturer’s recommendations for verification.
- To complete the Certificates of Data Destruction sticker, perform Steps #2-4 of Step 4A, On Electronic Device with Hard Disk Drive.
G. On Mobile Device(s)
- To verify, the phone will power up and begin the setup procedure as if it were a new device.
- To complete the Certificates of Data Destruction sticker, perform Steps #2-4 of Step 4A, On Electronic Device with Hard Disk Drive.
H. On Non-volatile Memory Devices (Router, Switch or Firewall Hardware)
- To verify, follow the manufacturer’s recommendations for verification.
- To complete the Certificates of Data Destruction sticker, perform Steps #2-4 of Step 4A, On Electronic Device with Hard Disk Drive.
Artifacts
| Artifact | Purpose |
|---|---|
| Sanitized information system media or Mason-owned electronic device | These are information system media or Mason-owned electronic devices that have undergone data sanitization. |
| Certificates of Data Destruction sticker | This sticker includes information on the type of sanitization technique selected, the names of the individuals who sanitized and verified the media, and the dates when these tasks were completed. |
Timetable for Review
This procedure will be reviewed every year or more frequently as needed.
Approvals
Curtis McNay, Director, IT Security Office 6/26/2024
Revision History
| Version | Date | Organization/Author | Description of Changes |
|---|---|---|---|
| 1.0 | 7/25/2019 | ITSO | Initial release |
| 2.0 | 1/12/2022 | ITSO | Annual Review with major changes (new sticker template and section rewrites) |
| 3.0 | 6/26/2023 | ITSO | Annual Review with major changes (replaced use of DBAN with ShredOS and data sanitization technique workflow and updated Certificate of Destruction label) |
| 3.1 | 6/18/2024 | ITSO | Annual review with minor changes (DCN update, grammatical edits, and update on review frequency). |